Index
Introduction
The Gas Detection and Alert System is an advanced safety device designed to monitor and detect harmful gases in the environment using the highly sensitive MQ-2 gas sensor. It continuously tracks gas levels and provides real-time alerts through a combination of a buzzer and LEDs, ensuring immediate warnings during potential gas leaks.
The system is user-friendly and easy to integrate into existing setups, making it suitable for various applications. It is designed to enhance safety in homes, industries, and laboratories by minimizing the risk of accidents caused by gas leaks. The compact design ensures seamless installation in confined spaces. This system is a reliable solution for maintaining a safe and secure environment.
Required Components
- Arduino Board (e.g., Arduino Uno)
- MQ2 Gas Sensor
- Buzzer Module
- LEDs (tow)
- Jumper Wires
- Breadboard (optional)
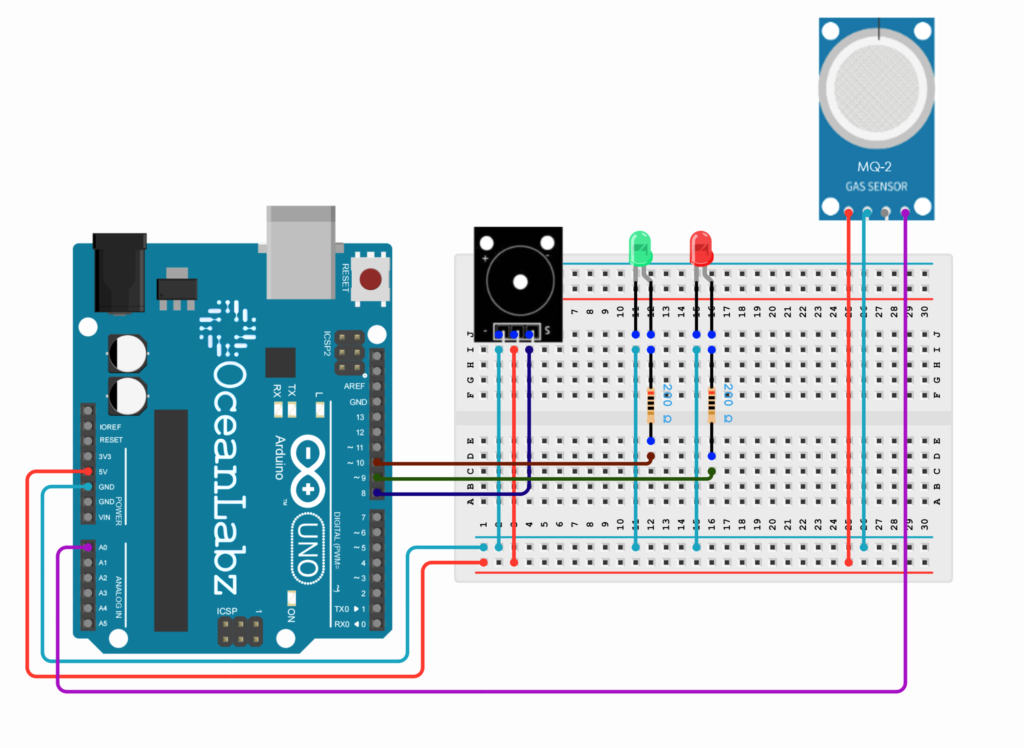
Circuit Diagram / Wiring
- MQ2 Gas Sensor
- MQ2 SENSOR VCC → 5V (Arduino)
- MQ2 SENSOR GND → GND (Arduino)
- MQ2 SENSOR AO (Analog Output) → Pin A0 (Arduino)
- Buzzer Module
- Buzzer VCC → 5V (Arduino)
- Buzzer GND → GND (Arduino)
- Buzzer SINGNAL → Pin D8 (Arduino)
- LEDs
- Connect the red LED anode to pin 9 (via a 220-ohm resistor) and cathode to GND.
- Connect the green LED anode to pin 10 (via a 220-ohm resistor) and cathode to GND.

Arduino Code
// Define pins
const int mq2Pin = A0;  // Analog pin for MQ-2 sensor output
const int buzzerPin = 8; // Digital pin for buzzer
const int redLED = 9;    // Digital pin for Red LED (Gas/Smoke Alert)
const int greenLED = 10; // Digital pin for Green LED (Normal state)

// Detection threshold (calibrate as needed)
const int detectionThresholdGas = 600;  // Threshold for gas detection
const int detectionThresholdSmoke = 30;  // Threshold for smoke detection (adjusted)

void setup() {
  pinMode(buzzerPin, OUTPUT);  // Set buzzer as output
  pinMode(redLED, OUTPUT);     // Set Red LED as output
  pinMode(greenLED, OUTPUT);   // Set Green LED as output
  Serial.begin(9600);          // Initialize serial communication
}

void loop() {
  int sensorValue = analogRead(mq2Pin); // Read MQ-2 sensor value
  Serial.print("Sensor Value: ");
  Serial.println(sensorValue);

  // Check if gas or smoke is detected
  if (sensorValue > detectionThresholdGas) {
    // Gas detected
    Serial.println("Gas Detected!");
    digitalWrite(redLED, HIGH);  // Turn on Red LED
    digitalWrite(greenLED, LOW); // Turn off Green LED
    tone(buzzerPin, 1500, 500);  // Play a tone at 1500 Hz for 500ms
  }
  else if (sensorValue > detectionThresholdSmoke) {
    // Smoke detected (if value is above smoke threshold)
    Serial.println("Smoke Detected!");
    digitalWrite(redLED, HIGH);  // Turn on Red LED
    digitalWrite(greenLED, LOW); // Turn off Green LED
    tone(buzzerPin, 1500, 500);  // Play a tone at 1500 Hz for 500ms
  }
  else {
    // No Gas or Smoke detected
    Serial.println("No Gas or Smoke Detected!");
    digitalWrite(redLED, LOW);   // Turn off Red LED
    digitalWrite(greenLED, HIGH); // Turn on Green LED
    noTone(buzzerPin);           // Stop buzzer sound
  }

  delay(1000); // Delay for stable readings
}
Explanation
Sensor Setup: The MQ-2 gas and smoke sensor is connected to analog pin A0. The buzzer, red LED, and green LED are connected to digital pins 8, 9, and 10 respectively.
Thresholds for Detection: The code defines two detection thresholds:
detectionThresholdGas: 600 for detecting gas.detectionThresholdSmoke: 30 for detecting smoke.
Detection Logic:
- If the sensor value exceeds the gas threshold, the red LED is turned on, the green LED is turned off, and a buzzer tone is emitted.
- If the sensor value exceeds the smoke threshold, the same actions are performed for smoke detection.
- If neither is detected, the red LED is off, the green LED is on, and the buzzer is off.


