Index
Introduction
In this tutorial, we’ll explore how to use an Arduino Nano, a WS2812B LED strip, and a rotary encoder to create an interactive lighting system. This setup allows you to control LED colors and patterns in real-time based on the encoder’s input. Let’s dive into the code and understand how it works.
How It Works
- Mode Switching: Pressing the rotary encoder button cycles through different lighting modes.
- Dynamic Effects: The encoder adjusts color and effects based on its rotation, including single moving LEDs, uniform colors, and auto-moving light patterns.
- Customization: Adjust the
NUM_LEDS,LED_PIN, and other parameters to fit your specific LED strip and project needs.
Materials Needed
- Breadboard and jumper wires
- Power supply for the LED strip (5V recommended)

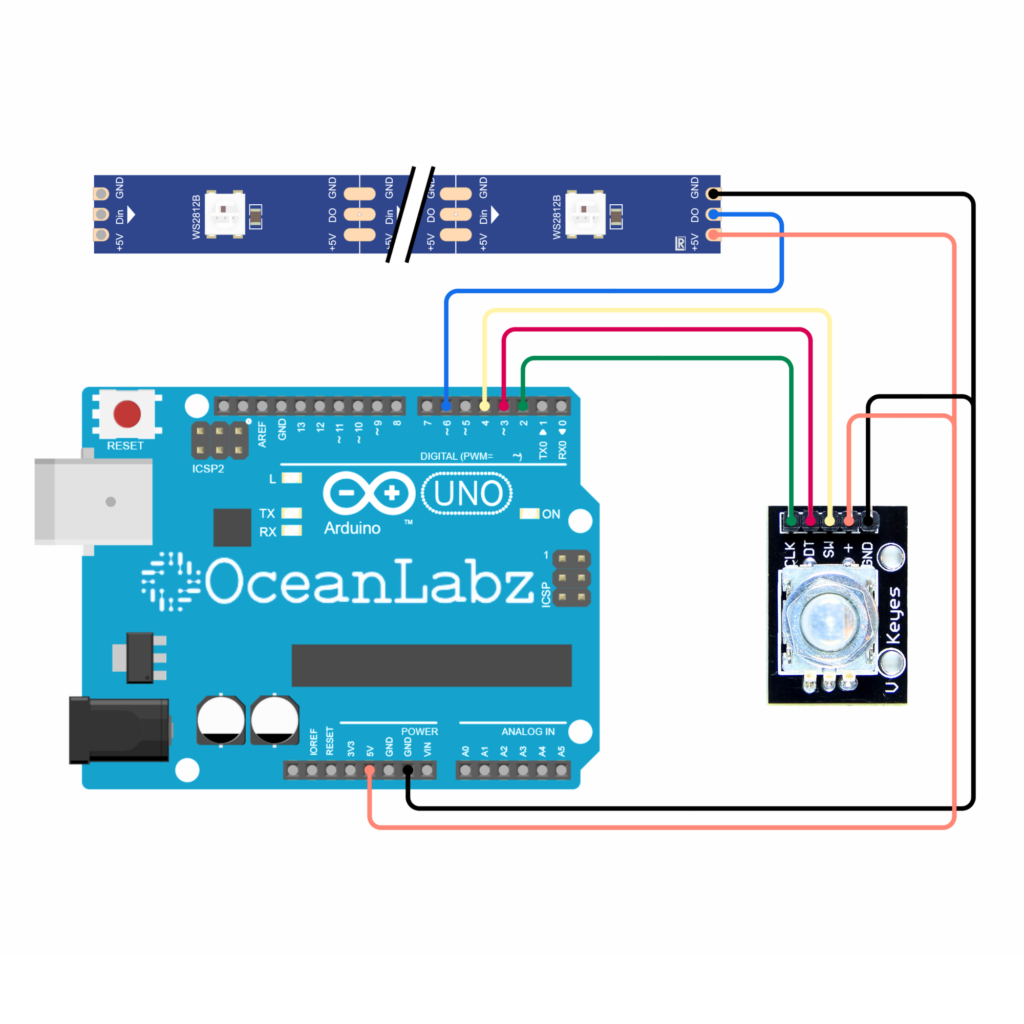
Circuit Diagram
| Rotary Encoder | Arduino |
| VCC | 3.3 – 5V |
| GND | GND |
| CLK (Clock) | D2 |
| DT (Data) | D3 |
| SW (Switch) | D4 |
| WS2812B | Arduino |
| VCC | 5V |
| GND | GND |
| DO | D6 |

Code
Install the following libraries in the Arduino IDE:
- Adafruit NeoPixel
- Encoder
#include <Encoder.h>
#include <Adafruit_NeoPixel.h>

const int NUM_LEDS = 30;           // Number of LEDs in the strip
const int LED_PIN = 5;             // Pin for the LED strip
const int BRIGHTNESS = 255;        // Brightness of the LEDs
const int WHEEL_SIZE = 256;        // Size of the color wheel
const int ENCODER_PIN_1 = 2;       // Rotary encoder pin 1
const int ENCODER_PIN_2 = 3;       // Rotary encoder pin 2
const int ENCODER_BUTTON = 4;      // Rotary encoder button

Adafruit_NeoPixel strip = Adafruit_NeoPixel(NUM_LEDS, LED_PIN, NEO_RGB + NEO_KHZ800);
Encoder encoder(ENCODER_PIN_1, ENCODER_PIN_2);
int mode = 0;
long lastPush = 0;
int autoPosition = 0;

void initializeToBlack() {
  for (int i = 0; i < NUM_LEDS; i++) {
    strip.setPixelColor(i, 0);
  }
}

void setup() {
  Serial.begin(9600);
  pinMode(ENCODER_BUTTON, INPUT_PULLUP); // Enable internal pull-up resistor
  strip.begin();
  initializeToBlack();
  strip.show();
}

long normalize(long value, long radix) {
  long rval = value % radix;
  return rval < 0 ? radix + rval : rval;
}

void loop() {
  int button = digitalRead(ENCODER_BUTTON);
  if (button == LOW) {
    if ((millis() - lastPush) > 250) {
      lastPush = millis();
      mode = (mode + 1) % 5; // Cycle through 5 modes
    }
  }

  long knobValue = encoder.read() / 2;
  long ledPosition = normalize(knobValue, NUM_LEDS);
  long colorValue = normalize(knobValue * 5, WHEEL_SIZE);
  long sleepValue = abs(knobValue) % 500;

  switch (mode) {
    case 0: // All LEDs off
      initializeToBlack();
      break;
    case 1: // Single LED moves with the rotary encoder
      initializeToBlack();
      strip.setPixelColor(ledPosition, colorWheel(BRIGHTNESS, colorValue));
      break;
    case 2: // All LEDs show the same color, changing with the rotary encoder
      for (int i = 0; i < NUM_LEDS; i++) {
        strip.setPixelColor(i, colorWheel(BRIGHTNESS, colorValue));
      }
      break;
    case 3: // One auto-moving light, speed controlled by the rotary encoder
      delay(sleepValue);
      initializeToBlack();
      strip.setPixelColor(autoPosition, colorWheel(BRIGHTNESS, autoPosition * (WHEEL_SIZE / NUM_LEDS)));
      autoPosition = (autoPosition + 1) % NUM_LEDS;
      break;
    case 4: // Auto-moving rainbow slug, speed controlled by the rotary encoder
      const int SLUG_SIZE = 15;
      delay(sleepValue);
      initializeToBlack();
      for (int i = 0; i < SLUG_SIZE; i++) {
        strip.setPixelColor((i + autoPosition) % NUM_LEDS, colorWheel(BRIGHTNESS, i * (WHEEL_SIZE / SLUG_SIZE)));
      }
      autoPosition = (autoPosition + 1) % NUM_LEDS;
      break;
  }
  strip.show();
}

// Function to return a color from the color wheel
uint32_t colorWheel(float intensity, byte wheelPos) {
  const int WHEEL_THIRD = (WHEEL_SIZE - 1) / 3;

  intensity = constrain(intensity, 0.0, 1.0);

  byte colorIndex = (wheelPos % WHEEL_THIRD) * 3;
  int fadeColor = (255 - colorIndex) * intensity;
  int increaseColor = colorIndex * intensity;

  switch (wheelPos / WHEEL_THIRD) {
    case 0: return strip.Color(fadeColor, 0, increaseColor);       // Red to Blue
    case 1: return strip.Color(0, increaseColor, fadeColor);       // Blue to Green
    case 2: return strip.Color(increaseColor, fadeColor, 0);       // Green to Red
  }
  return 0; // Fallback color (black)
}
NOTE:
This interactive lighting project combines a rotary encoder with a WS2812B LED strip to create a visually engaging and customizable lighting system. Whether you’re decorating a space or just experimenting with light effects, this setup offers both versatility and creative potential.
Additional Resources
For more information about the components used in this project, check out the following links:
