Index
Introduction to Web Servers & ESP32
A web server is a software or hardware system that serves content to clients over the internet or an intranet. It handles requests from clients, typically web browsers, and responds with the appropriate resources, such as web pages, images, or other data.
A web client and a web server communicate using a special protocol known as Hypertext Transfer Protocol (HTTP).
The ESP32, a popular microcontroller with built-in Wi-Fi and Bluetooth capabilities, can function as a web server. This enables it to host web pages, control devices, and monitor sensors remotely via a web interface.
How Web Servers Work
- Client Request: A client (e.g., a web browser) sends an HTTP request to the server, requesting a specific resource.
- Server Response: The web server processes the request, retrieves or generates the requested resource, and sends an HTTP response back to the client.
- Client Display: The client receives the response and displays the content, such as a web page, to the user.
Introduction to ESP32 Operation Modes: STA and AP
The ESP32 microcontroller is renowned for its versatility, especially with its built-in Wi-Fi capabilities. It operates in two primary modes: Station (STA) mode and Access Point (AP) mode. Understanding these modes is crucial for creating web server and other robust IoT applications.
Station (STA) Mode
In Station mode, the ESP32 connects to an existing Wi-Fi network, just like your smartphone or laptop. This mode is commonly used when the ESP32 needs to access the internet or communicate with other devices on the same network
Access Point (AP) Mode
In Access Point mode, the ESP32 creates its own Wi-Fi network, allowing other devices to connect directly to it. This mode is useful when you want to set up a local network without relying on an existing Wi-Fi infrastructure.
Example: ESP32 Web Server
To illustrate how an ESP32 web server works, let’s create a simple web server that controls an LED.
Components Needed:
- ESP32 development board
- LED
- Resistor (220 ohm)
- Breadboard and jumper wires
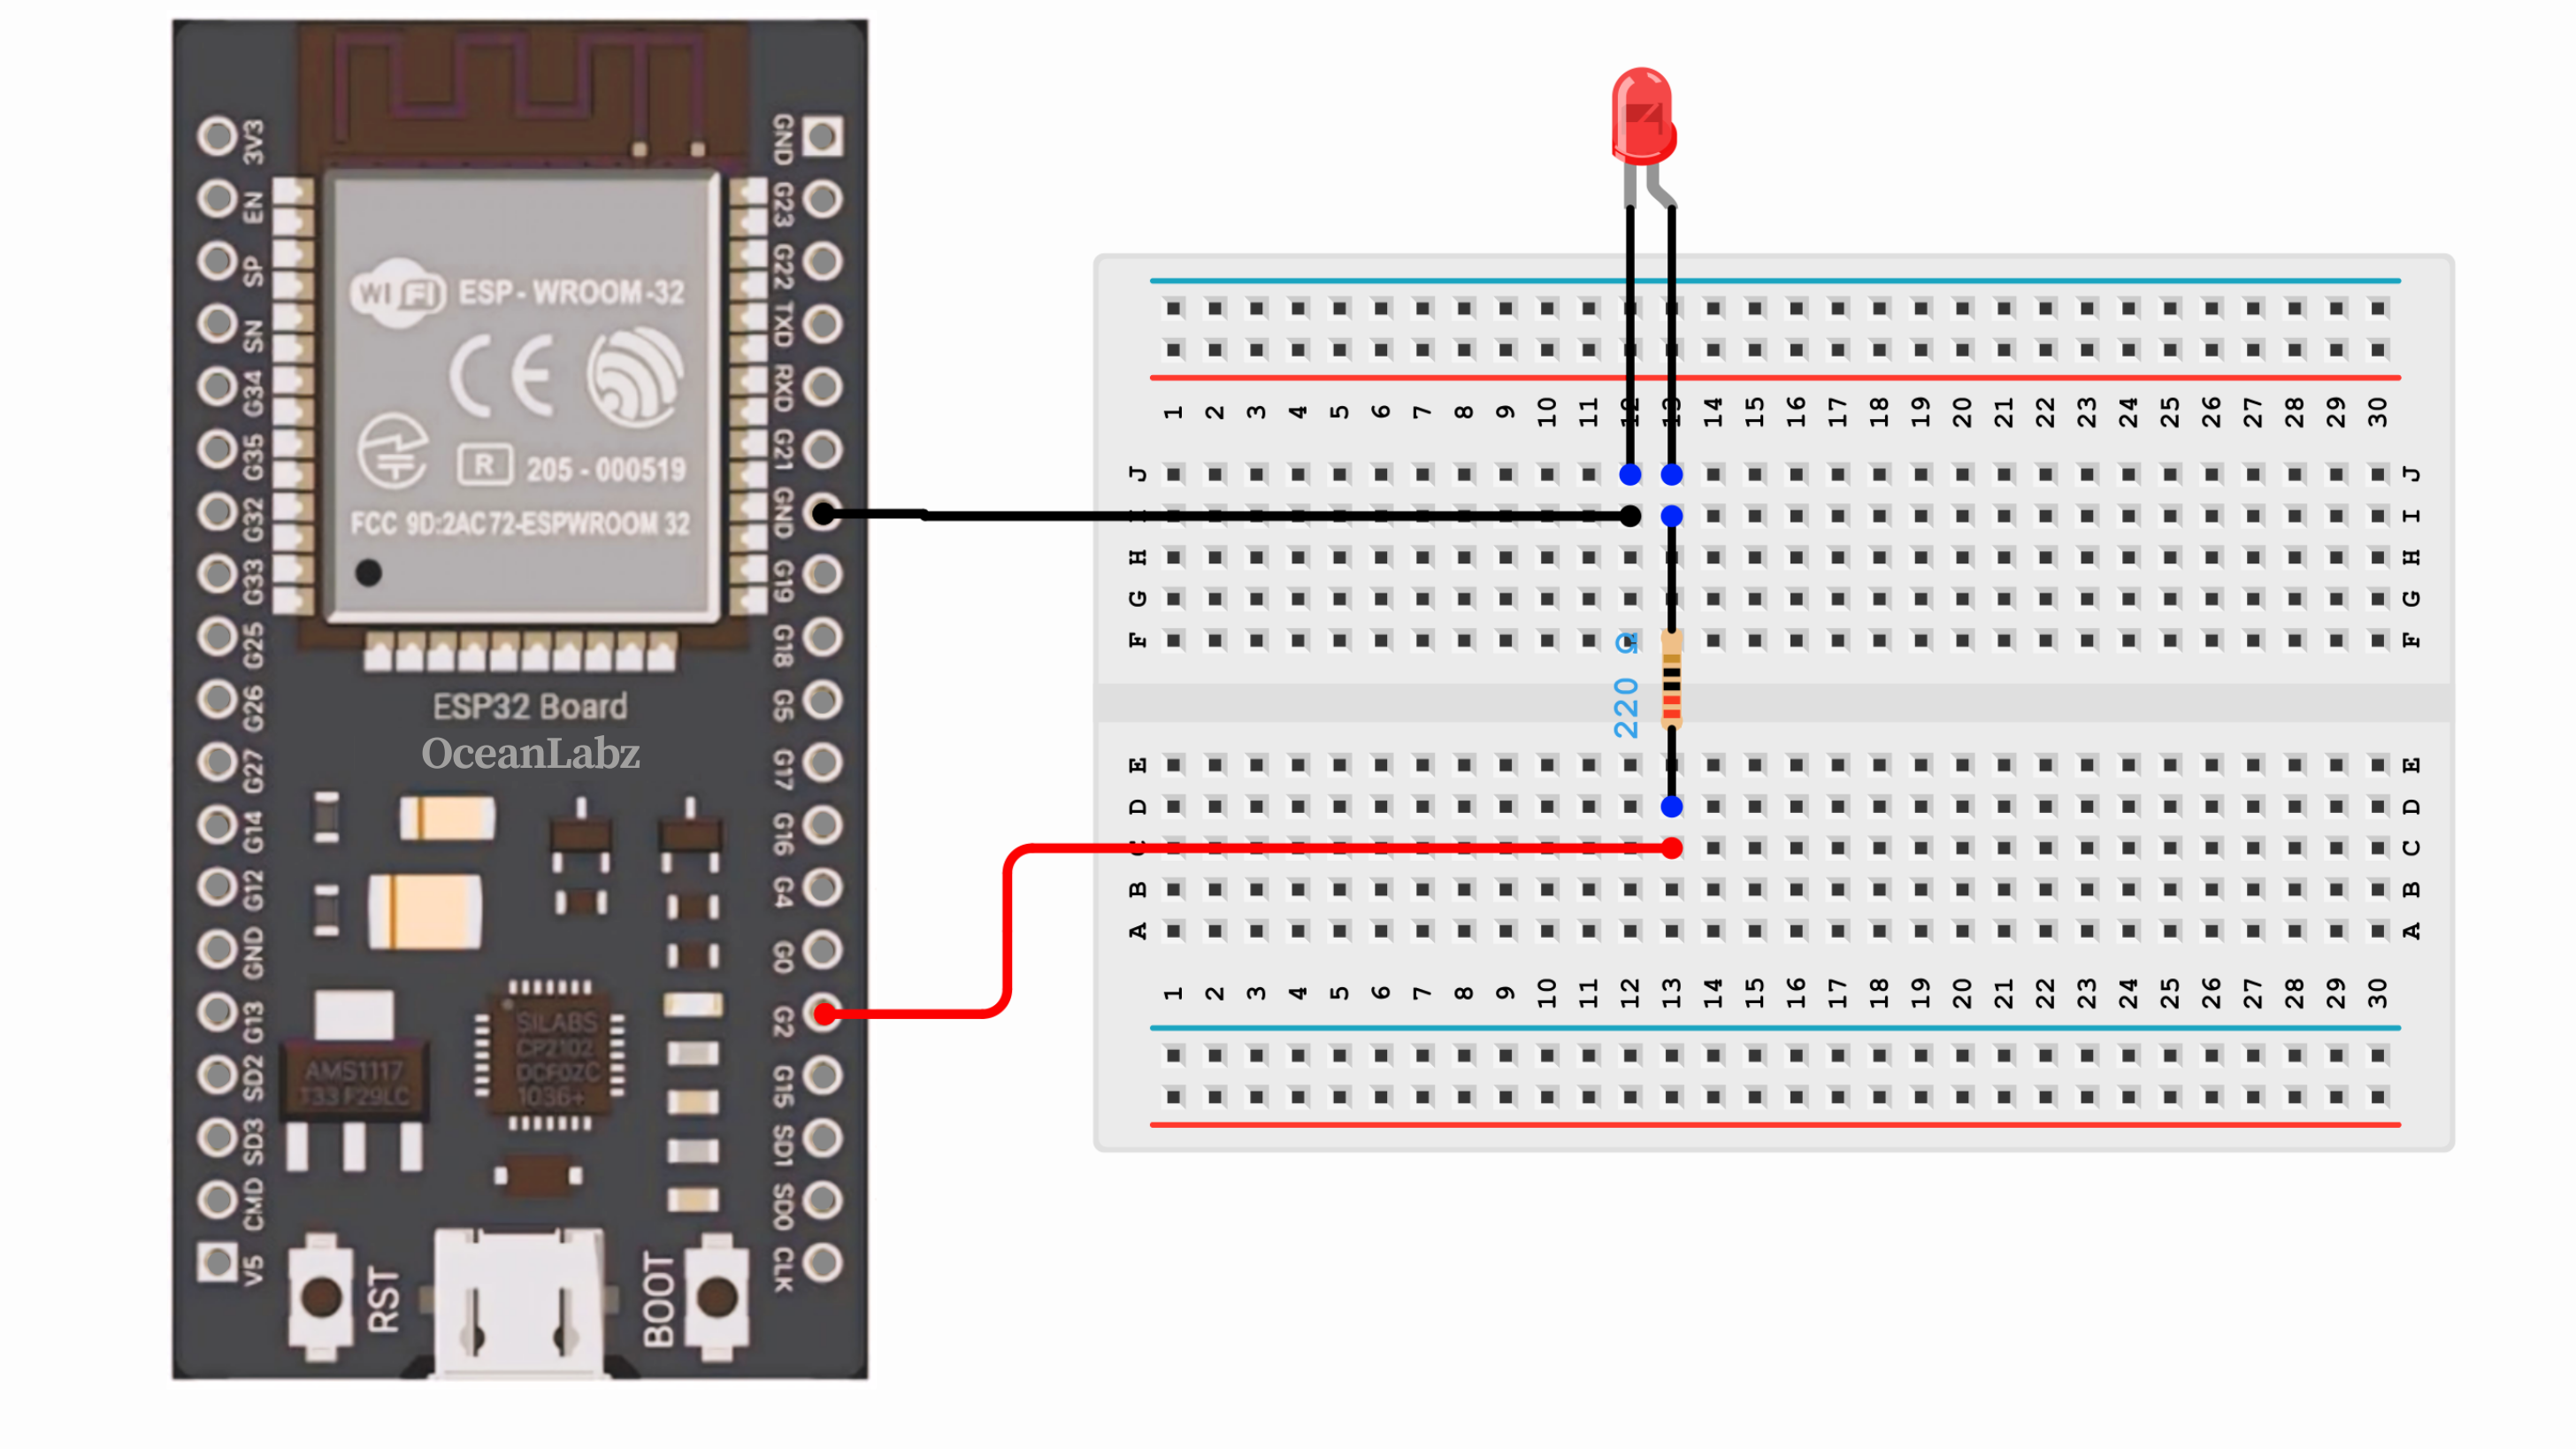
Steps:
- Setup the Hardware: Connect the LED and resistor to GPIO 2 pins of the ESP32.
- Write the Code: Use the Arduino IDE to program the ESP32.
Here’s a sample code to get started:
Configuring the ESP32 Web Server in Station (STA) mode
This example demonstrates how to set up the ESP32 as a Web Server in Station (STA) mode, allowing it to serve web pages to any connected client. To get started, connect your ESP32 to your computer and upload the provided sketch.
Before you proceed with uploading the sketch, you must make some changes to ensure that it works for you. To connect ESP32 to an existing network, you must modify the following two variables with your network credentials.

Once you are done, go ahead and try this sketch
#include <WiFi.h>
#include <WebServer.h>

const char* ssid = "your_SSID";
const char* password = "your_PASSWORD";

WebServer server(80);

const int ledPin = 2; // GPIO pin where the LED is connected

void handleRoot() {
  server.send(200, "text/html", "<h1>ESP32 Web Server</h1><p><a href=\"/LED_ON\">Turn On LED</a></p><p><a href=\"/LED_OFF\">Turn Off LED</a></p>");
}

void handleLEDOn() {
  digitalWrite(ledPin, HIGH);
  server.send(200, "text/html", "<h1>LED is ON</h1><p><a href=\"/\">Back</a></p>");
}

void handleLEDOff() {
  digitalWrite(ledPin, LOW);
  server.send(200, "text/html", "<h1>LED is OFF</h1><p><a href=\"/\">Back</a></p>");
}

void setup() {
  Serial.begin(115200);
  pinMode(ledPin, OUTPUT);
  digitalWrite(ledPin, LOW);

  WiFi.begin(ssid, password);
  while (WiFi.status() != WL_CONNECTED) {
    delay(1000);
    Serial.println("Connecting to WiFi...");
  }
  Serial.println("Connected to WiFi");

  //Print the IP address
  Serial.println("IP address: ");
  Serial.println(WiFi.localIP());

  server.on("/", handleRoot);
  server.on("/LED_ON", handleLEDOn);
  server.on("/LED_OFF", handleLEDOff);

  server.begin();
  Serial.println("HTTP server started");
}

void loop() {
  server.handleClient();
}
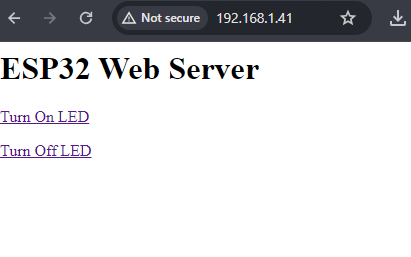
The O/P will be look like this, let’s take an advance example, then we will understand in detail
Advance Example
Previously, we explored a basic example; now, let’s dive into a more advanced example.
#include <WiFi.h>
#include <WebServer.h>

const char* ssid = "your_SSID";  // SSID OF YOUR HOME/OFFICE ROUTER
const char* password = "your_PASSWORD";
WebServer server(80);

const int ledPin = 2; // GPIO pin where the LED is connected
bool ledState = LOW;

void handleRoot() {
  String html = "<!DOCTYPE html><html>";
  html += "<head><meta name=\"viewport\" content=\"width=device-width, initial-scale=1\">";
  html += "<style>body {font-family: Arial, sans-serif; text-align: center; padding: 50px;}";
  html += ".button {display: inline-block; padding: 15px 25px; font-size: 24px; cursor: pointer; text-align: center; text-decoration: none; outline: none; color: #fff; background-color: #4CAF50; border: none; border-radius: 15px; box-shadow: 0 9px #999;}";
  html += ".button:hover {background-color: #3e8e41}";
  html += ".button:active {background-color: #3e8e41; box-shadow: 0 5px #666; transform: translateY(4px);}";
  html += ".button-off {background-color: #f44336;}";
  html += ".button-off:hover {background-color: #da190b}";
  html += ".button-off:active {background-color: #da190b; box-shadow: 0 5px #666; transform: translateY(4px);}";
  html += ".bulb {width: 100px; height: 100px; margin-top: 20px; border-radius: 50%; display: inline-block;}";
  html += ".bulb-on {background-color: yellow;}";
  html += ".bulb-off {background-color: gray;}";
  html += "</style></head><body>";
  html += "<h1>ESP32 Web Server</h1>";
  html += "<p><a href=\"/LED_ON\"><button class=\"button\">Turn On LED</button></a></p>";
  html += "<p><a href=\"/LED_OFF\"><button class=\"button button-off\">Turn Off LED</button></a></p>";
  html += "<div class=\"bulb " + String(ledState ? "bulb-on" : "bulb-off") + "\"></div>";
  html += "</body></html>";

  server.send(200, "text/html", html);
}

void handleLEDOn() {
  ledState = HIGH;
  digitalWrite(ledPin, HIGH);
  handleRoot(); // Refresh the page to update the bulb status
}

void handleLEDOff() {
  ledState = LOW;
  digitalWrite(ledPin, LOW);
  handleRoot(); // Refresh the page to update the bulb status
}

void setup() {
  Serial.begin(115200);
  pinMode(ledPin, OUTPUT);
  digitalWrite(ledPin, LOW);

  WiFi.begin(ssid, password);
  while (WiFi.status() != WL_CONNECTED) {
    delay(1000);
    Serial.println("Connecting to WiFi...");
  }
  Serial.println("Connected to WiFi");

  // Print the IP address
  Serial.println("IP address: ");
  Serial.println(WiFi.localIP());

  server.on("/", handleRoot);
  server.on("/LED_ON", handleLEDOn);
  server.on("/LED_OFF", handleLEDOff);

  server.begin();
  Serial.println("HTTP server started");
}

void loop() {
  server.handleClient();
}
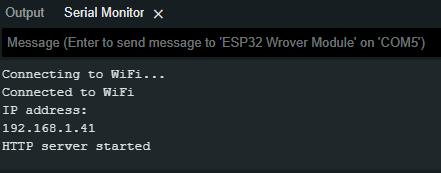
After uploading the sketch, open the Serial Monitor at 115200 baud and press the RESET button on the ESP32. If everything is fine, it will show the IP Address 192.168.1.41( it can be different in your case ) & “HTTP server started” message.
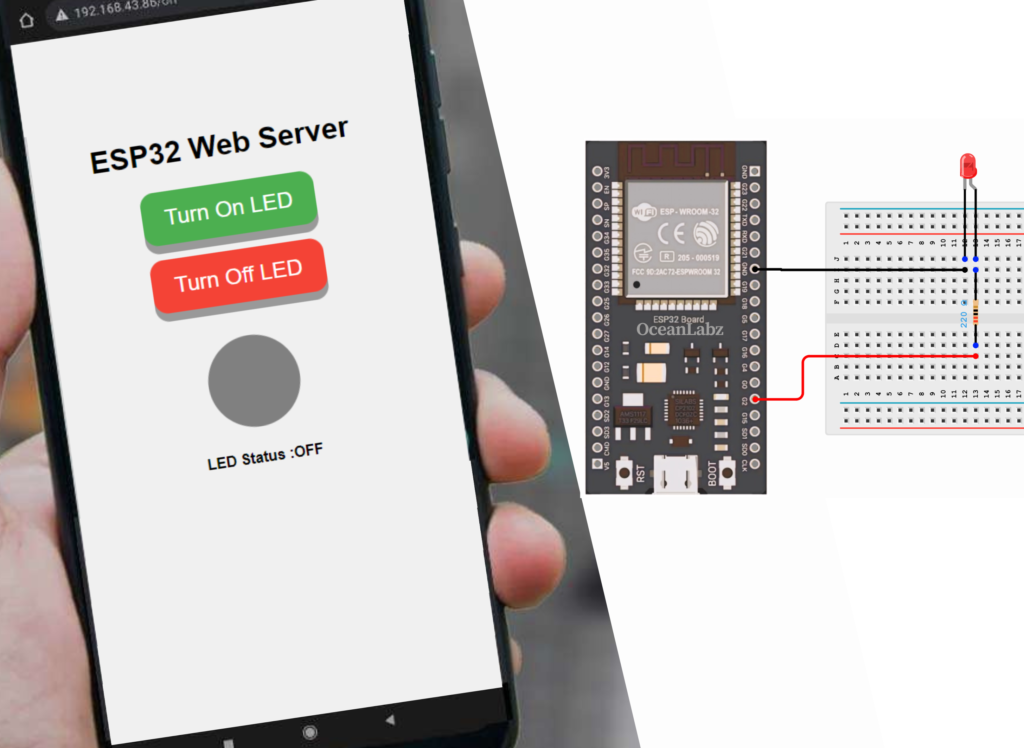
After connecting ESP32 to your home network, open a browser and navigate to 192.168.43.1. The ESP32 should return a web page displaying the current status of the LEDs , buttons and a nice bulb that represent the state of LED . you can press button to change the state of LED.
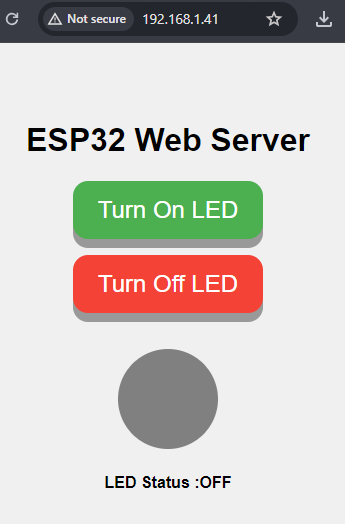
Here is the LED ON state

Code Explaination
Includes and Globals
#include <WiFi.h>
#include <WebServer.h>

const char* ssid = "your_SSID";
const char* password = "your_PASSWORD";

WebServer server(80);

const int ledPin = 2; // GPIO pin where the LED is connected
bool ledState = LOW;
Libraries:
WiFi.his included to handle Wi-Fi connectivity.WebServer.his included to create and manage the web server.
SSID and Password:
- These are the credentials for connecting to a Wi-Fi network.
WebServer Instance:
- An instance of
WebServeris created on port 80.
LED Pin and State:
ledPindefines the GPIO pin where the LED is connected.ledStateis a boolean variable that keeps track of the LED’s state (on or off).
HTML Page Handling
void handleRoot() {
  String html = "<!DOCTYPE html><html>";
  html += "<head><meta name=\"viewport\" content=\"width=device-width, initial-scale=1\">";
  html += "<style>body {font-family: Arial, sans-serif; text-align: center; padding: 50px;}";
  html += ".button {display: inline-block; padding: 15px 25px; font-size: 24px; cursor: pointer; text-align: center; text-decoration: none; outline: none; color: #fff; background-color: #4CAF50; border: none; border-radius: 15px; box-shadow: 0 9px #999;}";
  html += ".button:hover {background-color: #3e8e41}";
  html += ".button:active {background-color: #3e8e41; box-shadow: 0 5px #666; transform: translateY(4px);}";
  html += ".button-off {background-color: #f44336;}";
  html += ".button-off:hover {background-color: #da190b}";
  html += ".button-off:active {background-color: #da190b; box-shadow: 0 5px #666; transform: translateY(4px);}";
  html += ".bulb {width: 100px; height: 100px; margin-top: 20px; border-radius: 50%; display: inline-block;}";
  html += ".bulb-on {background-color: yellow;}";
  html += ".bulb-off {background-color: gray;}";
  html += "</style></head><body>";
  html += "<h1>ESP32 Web Server</h1>";
  html += "<p><a href=\"/LED_ON\"><button class=\"button\">Turn On LED</button></a></p>";
  html += "<p><a href=\"/LED_OFF\"><button class=\"button button-off\">Turn Off LED</button></a></p>";
  html += "<div class=\"bulb " + String(ledState ? "bulb-on" : "bulb-off") + "\"></div>";
  html += "</body></html>";

  server.send(200, "text/html", html);
}
HTML and CSS:
- The HTML defines the structure and styling of the web page, including buttons and a “bulb” indicator.
- The buttons allow the user to turn the LED on and off.
- The
bulbdiv changes its class based on the LED state, altering its color accordingly.
Response:
server.send(200, "text/html", html);sends the HTML page as a response to the client.
LED On and Off Handlers
void handleLEDOn() {
  ledState = HIGH;
  digitalWrite(ledPin, HIGH);
  handleRoot(); // Refresh the page to update the bulb status
}

void handleLEDOff() {
  ledState = LOW;
  digitalWrite(ledPin, LOW);
  handleRoot(); // Refresh the page to update the bulb status
}
Turning LED On/Off:
- These functions set the
ledStateand update the LED pin accordingly. - They call
handleRoot()to refresh the web page, showing the updated LED state.
Setup Function
void setup() {
  Serial.begin(115200);
  pinMode(ledPin, OUTPUT);
  digitalWrite(ledPin, LOW);

  WiFi.begin(ssid, password);
  while (WiFi.status() != WL_CONNECTED) {
    delay(1000);
    Serial.println("Connecting to WiFi...");
  }
  Serial.println("Connected to WiFi");

  // Print the IP address
  Serial.println("IP address: ");
  Serial.println(WiFi.localIP());

  server.on("/", handleRoot);
  server.on("/LED_ON", handleLEDOn);
  server.on("/LED_OFF", handleLEDOff);

  server.begin();
  Serial.println("HTTP server started");
}
Serial Communication:
Serial.begin(115200);initializes serial communication for debugging.
LED Pin Setup:
pinMode(ledPin, OUTPUT);sets the LED pin as an output.digitalWrite(ledPin, LOW);ensures the LED is off initially.
WiFi Connection:
WiFi.begin(ssid, password);starts the connection process.- A
whileloop checks the connection status and prints a message every second until connected. - Once connected, the IP address is printed to the Serial Monitor.
Server Routes:
server.on("/", handleRoot);sets the function to handle the root URL.server.on("/LED_ON", handleLEDOn);sets the function to handle the URL/LED_ON.server.on("/LED_OFF", handleLEDOff);sets the function to handle the URL/LED_OFF.
Starting Server:
server.begin();starts the web server.
Loop Function
void loop() {
  server.handleClient();
}
Handle Client Requests:
server.handleClient();processes incoming client requests and triggers the appropriate handlers.
Configuring the ESP32 Web Server in Access Point (AP) mode
#include <WiFi.h>
#include <WebServer.h>

const char* ssid = "ESP32_Access_Point";
const char* password = "12345678";

WebServer server(80);

const int ledPin = 2; // GPIO pin where the LED is connected
bool ledState = LOW;

void handleRoot() {
  String html = "<!DOCTYPE html><html>";
  html += "<head><meta name=\"viewport\" content=\"width=device-width, initial-scale=1\">";
  html += "<style>body {font-family: Arial, sans-serif; text-align: center; padding: 50px;}";
  html += ".button {display: inline-block; padding: 15px 25px; font-size: 24px; cursor: pointer; text-align: center; text-decoration: none; outline: none; color: #fff; background-color: #4CAF50; border: none; border-radius: 15px; box-shadow: 0 9px #999;}";
  html += ".button:hover {background-color: #3e8e41}";
  html += ".button:active {background-color: #3e8e41; box-shadow: 0 5px #666; transform: translateY(4px);}";
  html += ".button-off {background-color: #f44336;}";
  html += ".button-off:hover {background-color: #da190b}";
  html += ".button-off:active {background-color: #da190b; box-shadow: 0 5px #666; transform: translateY(4px);}";
  html += ".bulb {width: 100px; height: 100px; margin-top: 20px; border-radius: 50%; display: inline-block;}";
  html += ".bulb-on {background-color: yellow;}";
  html += ".bulb-off {background-color: gray;}";
  html += "</style></head><body>";
  html += "<h1>ESP32 Web Server</h1>";
  html += "<p><a href=\"/LED_ON\"><button class=\"button\">Turn On LED</button></a></p>";
  html += "<p><a href=\"/LED_OFF\"><button class=\"button button-off\">Turn Off LED</button></a></p>";
  html += "<div class=\"bulb " + String(ledState ? "bulb-on" : "bulb-off") + "\"></div>";
  html += "</body></html>";

  server.send(200, "text/html", html);
}

void handleLEDOn() {
  ledState = HIGH;
  digitalWrite(ledPin, HIGH);
  handleRoot(); // Refresh the page to update the bulb status
}

void handleLEDOff() {
  ledState = LOW;
  digitalWrite(ledPin, LOW);
  handleRoot(); // Refresh the page to update the bulb status
}

void setup() {
  Serial.begin(115200);
  pinMode(ledPin, OUTPUT);
  digitalWrite(ledPin, LOW);

  // Start Wi-Fi in AP mode
  WiFi.softAP(ssid, password);

  Serial.println("Access Point started");
  Serial.print("IP address: ");
  Serial.println(WiFi.softAPIP());

  server.on("/", handleRoot);
  server.on("/LED_ON", handleLEDOn);
  server.on("/LED_OFF", handleLEDOff);

  server.begin();
  Serial.println("HTTP server started");
}

void loop() {
  server.handleClient();
}

