Index
Introduction
In this tutorial, we’ll explore how to use an Arduino Nano, a WS2812B LED strip, and a rotary encoder to create an interactive lighting system. This setup allows you to control LED colors and patterns in real-time based on the encoder’s input. Let’s dive into the code and understand how it works.
This interactive lighting project combines a rotary encoder with a WS2812B LED strip to create a visually engaging and customizable lighting system. Whether you’re decorating a space or just experimenting with light effects, this setup offers both versatility and creative potential.
- Mode Switching: Pressing the rotary encoder button cycles through different lighting modes.
- Dynamic Effects: The encoder adjusts color and effects based on its rotation, including single moving LEDs, uniform colors, and auto-moving light patterns.
- Customization: Adjust the
NUM_LEDS,LED_PIN, and other parameters to fit your specific LED strip and project needs.
Required Components
- Arduino Nano / Uno
- Rotary Encoder
- WS2812B LED Strip
- Breadboard and jumper wires
- Power supply for the LED strip (5V recommended)
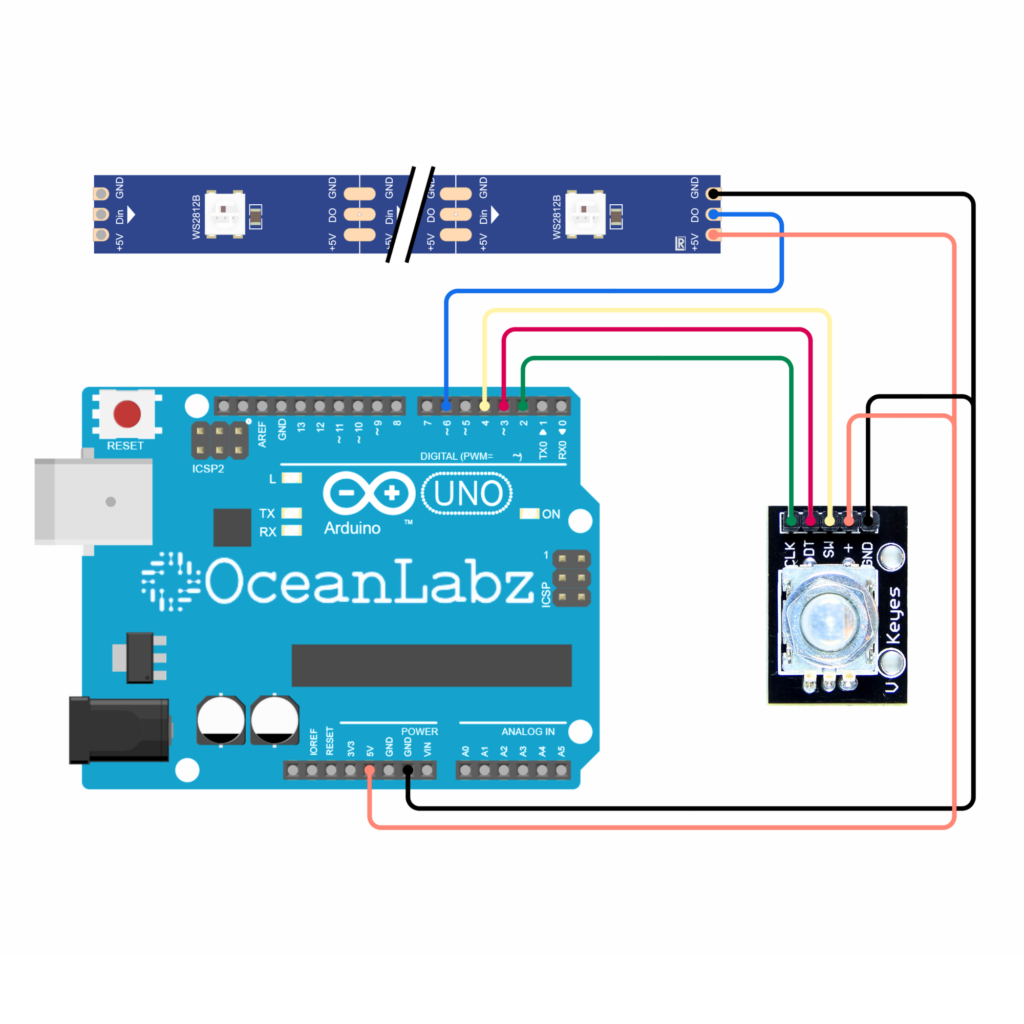
Circuit Diagram / Wiring
- Rotary Encoder With Arduino
- Rotary Encoder VCC → 5V (Arduino)
- Rotary Encoder GND → GND (Arduino)
- Rotary Encoder SW → Pin 4 (Arduino)
- Rotary Encoder DT→ Pin 3 (Arduino)
- Rotary Encoder CLK→ Pin 2 (Arduino)
- WS2812B With Arduino
- WS2812B VCC → 5V (Arduino)
- WS2812B GND → GND (Arduino)
- WS2812B DO→ Pin 6 (Arduino)

Arduino Code / Programming
Make sure you have the required libraries installed:
- Adafruit NeoPixel library for WS2812B LED Strip
- Encoder library for Rotary Encoder
#include <Encoder.h>
#include <Adafruit_NeoPixel.h>

const int NUM_LEDS = 30;           // Number of LEDs in the strip
const int LED_PIN = 5;             // Pin for the LED strip
const int BRIGHTNESS = 255;        // Brightness of the LEDs
const int WHEEL_SIZE = 256;        // Size of the color wheel
const int ENCODER_PIN_1 = 2;       // Rotary encoder pin 1
const int ENCODER_PIN_2 = 3;       // Rotary encoder pin 2
const int ENCODER_BUTTON = 4;      // Rotary encoder button

Adafruit_NeoPixel strip = Adafruit_NeoPixel(NUM_LEDS, LED_PIN, NEO_RGB + NEO_KHZ800);
Encoder encoder(ENCODER_PIN_1, ENCODER_PIN_2);
int mode = 0;
long lastPush = 0;
int autoPosition = 0;

void initializeToBlack() {
  for (int i = 0; i < NUM_LEDS; i++) {
    strip.setPixelColor(i, 0);
  }
}

void setup() {
  Serial.begin(9600);
  pinMode(ENCODER_BUTTON, INPUT_PULLUP); // Enable internal pull-up resistor
  strip.begin();
  initializeToBlack();
  strip.show();
}

long normalize(long value, long radix) {
  long rval = value % radix;
  return rval < 0 ? radix + rval : rval;
}

void loop() {
  int button = digitalRead(ENCODER_BUTTON);
  if (button == LOW) {
    if ((millis() - lastPush) > 250) {
      lastPush = millis();
      mode = (mode + 1) % 5; // Cycle through 5 modes
    }
  }

  long knobValue = encoder.read() / 2;
  long ledPosition = normalize(knobValue, NUM_LEDS);
  long colorValue = normalize(knobValue * 5, WHEEL_SIZE);
  long sleepValue = abs(knobValue) % 500;

  switch (mode) {
    case 0: // All LEDs off
      initializeToBlack();
      break;
    case 1: // Single LED moves with the rotary encoder
      initializeToBlack();
      strip.setPixelColor(ledPosition, colorWheel(BRIGHTNESS, colorValue));
      break;
    case 2: // All LEDs show the same color, changing with the rotary encoder
      for (int i = 0; i < NUM_LEDS; i++) {
        strip.setPixelColor(i, colorWheel(BRIGHTNESS, colorValue));
      }
      break;
    case 3: // One auto-moving light, speed controlled by the rotary encoder
      delay(sleepValue);
      initializeToBlack();
      strip.setPixelColor(autoPosition, colorWheel(BRIGHTNESS, autoPosition * (WHEEL_SIZE / NUM_LEDS)));
      autoPosition = (autoPosition + 1) % NUM_LEDS;
      break;
    case 4: // Auto-moving rainbow slug, speed controlled by the rotary encoder
      const int SLUG_SIZE = 15;
      delay(sleepValue);
      initializeToBlack();
      for (int i = 0; i < SLUG_SIZE; i++) {
        strip.setPixelColor((i + autoPosition) % NUM_LEDS, colorWheel(BRIGHTNESS, i * (WHEEL_SIZE / SLUG_SIZE)));
      }
      autoPosition = (autoPosition + 1) % NUM_LEDS;
      break;
  }
  strip.show();
}

// Function to return a color from the color wheel
uint32_t colorWheel(float intensity, byte wheelPos) {
  const int WHEEL_THIRD = (WHEEL_SIZE - 1) / 3;

  intensity = constrain(intensity, 0.0, 1.0);

  byte colorIndex = (wheelPos % WHEEL_THIRD) * 3;
  int fadeColor = (255 - colorIndex) * intensity;
  int increaseColor = colorIndex * intensity;

  switch (wheelPos / WHEEL_THIRD) {
    case 0: return strip.Color(fadeColor, 0, increaseColor);       // Red to Blue
    case 1: return strip.Color(0, increaseColor, fadeColor);       // Blue to Green
    case 2: return strip.Color(increaseColor, fadeColor, 0);       // Green to Red
  }
  return 0; // Fallback color (black)
}
Explanation
- This code controls an LED strip using a rotary encoder for mode and color adjustments, with five modes such as static, moving, and auto-sliding lights.
- The rotary encoder’s rotation determines the LED’s position, color, and speed of animations, while the button cycles through modes.
- A color wheel function generates RGB values for smooth transitions between colors.
- Modes include single LED control, uniform color, auto-moving lights, and a rainbow slug animation.


