Index
The CP210x USB chip converts a USB connection into a serial port, enabling communication between your computer and microcontrollers like the ESP32 or ESP8266. To program or exchange data, you must install the CP210x USB to UART Bridge Virtual COM Port drivers.
If you’re using an ESP32/ESP8266 for the first time and don’t see its COM port in the Arduino IDE, it likely means the USB driver is missing.
- Look at the chip near the voltage regulator on your board.
- If your board uses the Silabs CP2102 chip, install the CP210x USB to UART Bridge drivers to enable serial communication.
By installing the CP210x drivers as explained in this guide, you’ll ensure a working USB connection for any ESP board using a CP210x USB-to-UART chip.
Note: Another common USB chip in ESP32/ESP8266 modules is the CH340. Always check your board’s datasheet to identify the correct USB-to-UART chip and install the appropriate driver.
Installing CP210x USB to UART Bridge VCP Drivers (Windows PC)
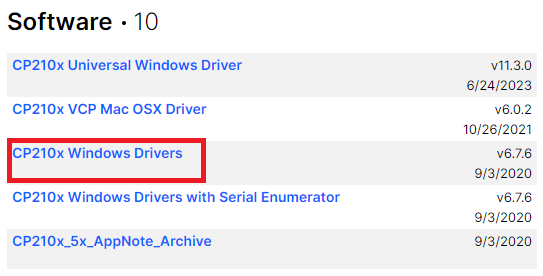
Start by downloading the CP210x USB Drivers from the official website. If you are on a Windows PC, you need to download the CP210x Windows Drivers folder highlighted in the image below.

After downloading the CP210x Windows Drivers, right-click the folder and unzip the installation files.

Open the unzipped folder and double-click the CP210xVCPInstaller_x64.exe file to start the installation process.

Follow the installation wizard, click the “Next” button, and agree with the terms of use to complete the installation process.

The CP210x USB drivers have been installed successfully.

Testing the CP210x USB Drivers
Click the search bar.

Search for “Device Manager” and open the control panel:

Having an ESP32/ESP8266 board connected to your Windows PC with a USB cable, under the “Ports” section you should see a device “Silicon Labs CP210x USB to UART Bridge (COM5)” (or with a different COM port number).
To program the ESP32/ESP8266 board with Arduino IDE, remember the COM port number, in our case it’s 5, COM5.

In the Arduino IDE, select your ESP32/ESP8266 board COMX Port, as shown earlier. Ours is COM5 Serial Port (USB).

That’s it! You should now be able to see the COMX Serial Port of the ESP32/ESP8266 in Arduino IDE. You can upload a new code to your ESP board to test it.


