Index
Introduction
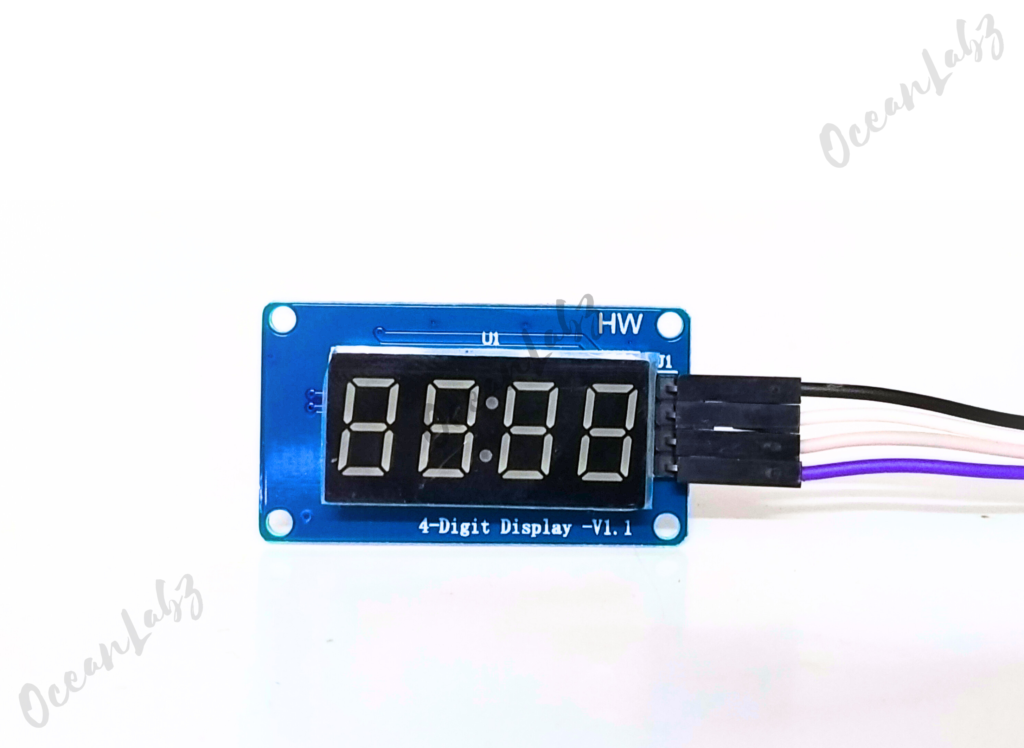
The TM1637 IC embedded in the module allows for easy control using just two pins for data communication, which significantly reduces the complexity of wiring and programming. In this tutorial, we will learn how to connect the TM1637 4-digit display module to an Arduino, write code to control the display, and explore various applications for this versatile module, enhancing your ability to present data visually in your electronic projects.
Required Components
- Arduino UNO, Nano
- 4-Digit 7-Segment Display module (TM1637-based)
- Jumper wires
- Breadboard
Pinout

Circuit Diagram / Wiring
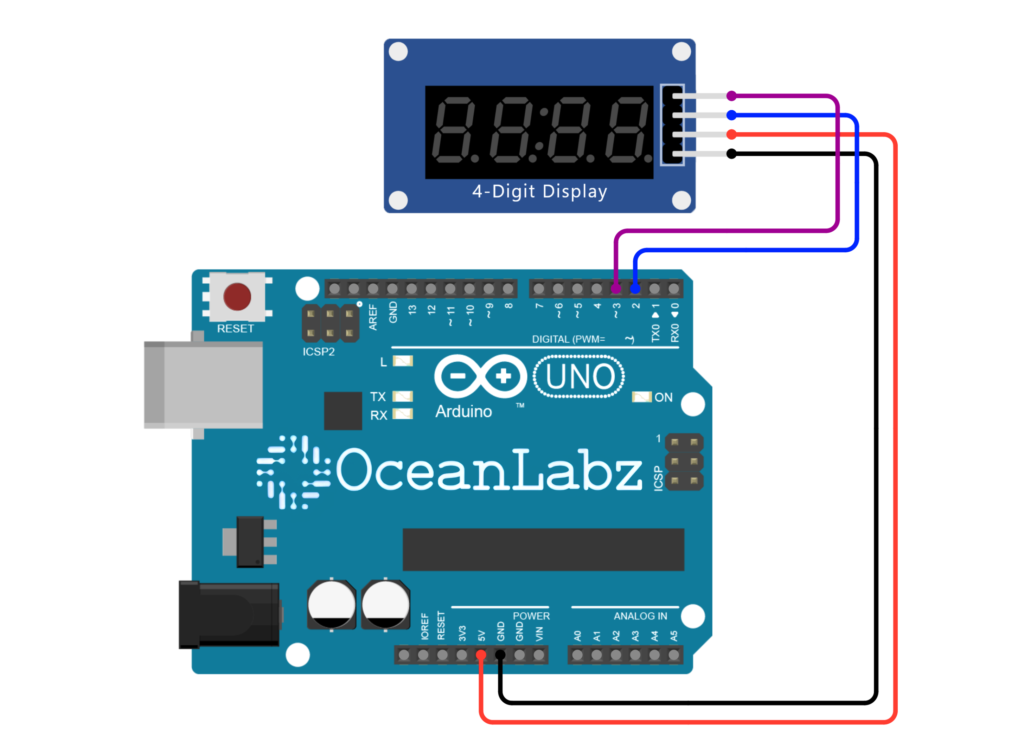
- VCC (TM1637) → 5V (Arduino)
- GND (TM1637) → GND (Arduino)
- DIO (TM1637) → Pin 2 (Arduino)
- CLK (TM1637) → Pin 3 (Arduino)
Arduino Code / Programming
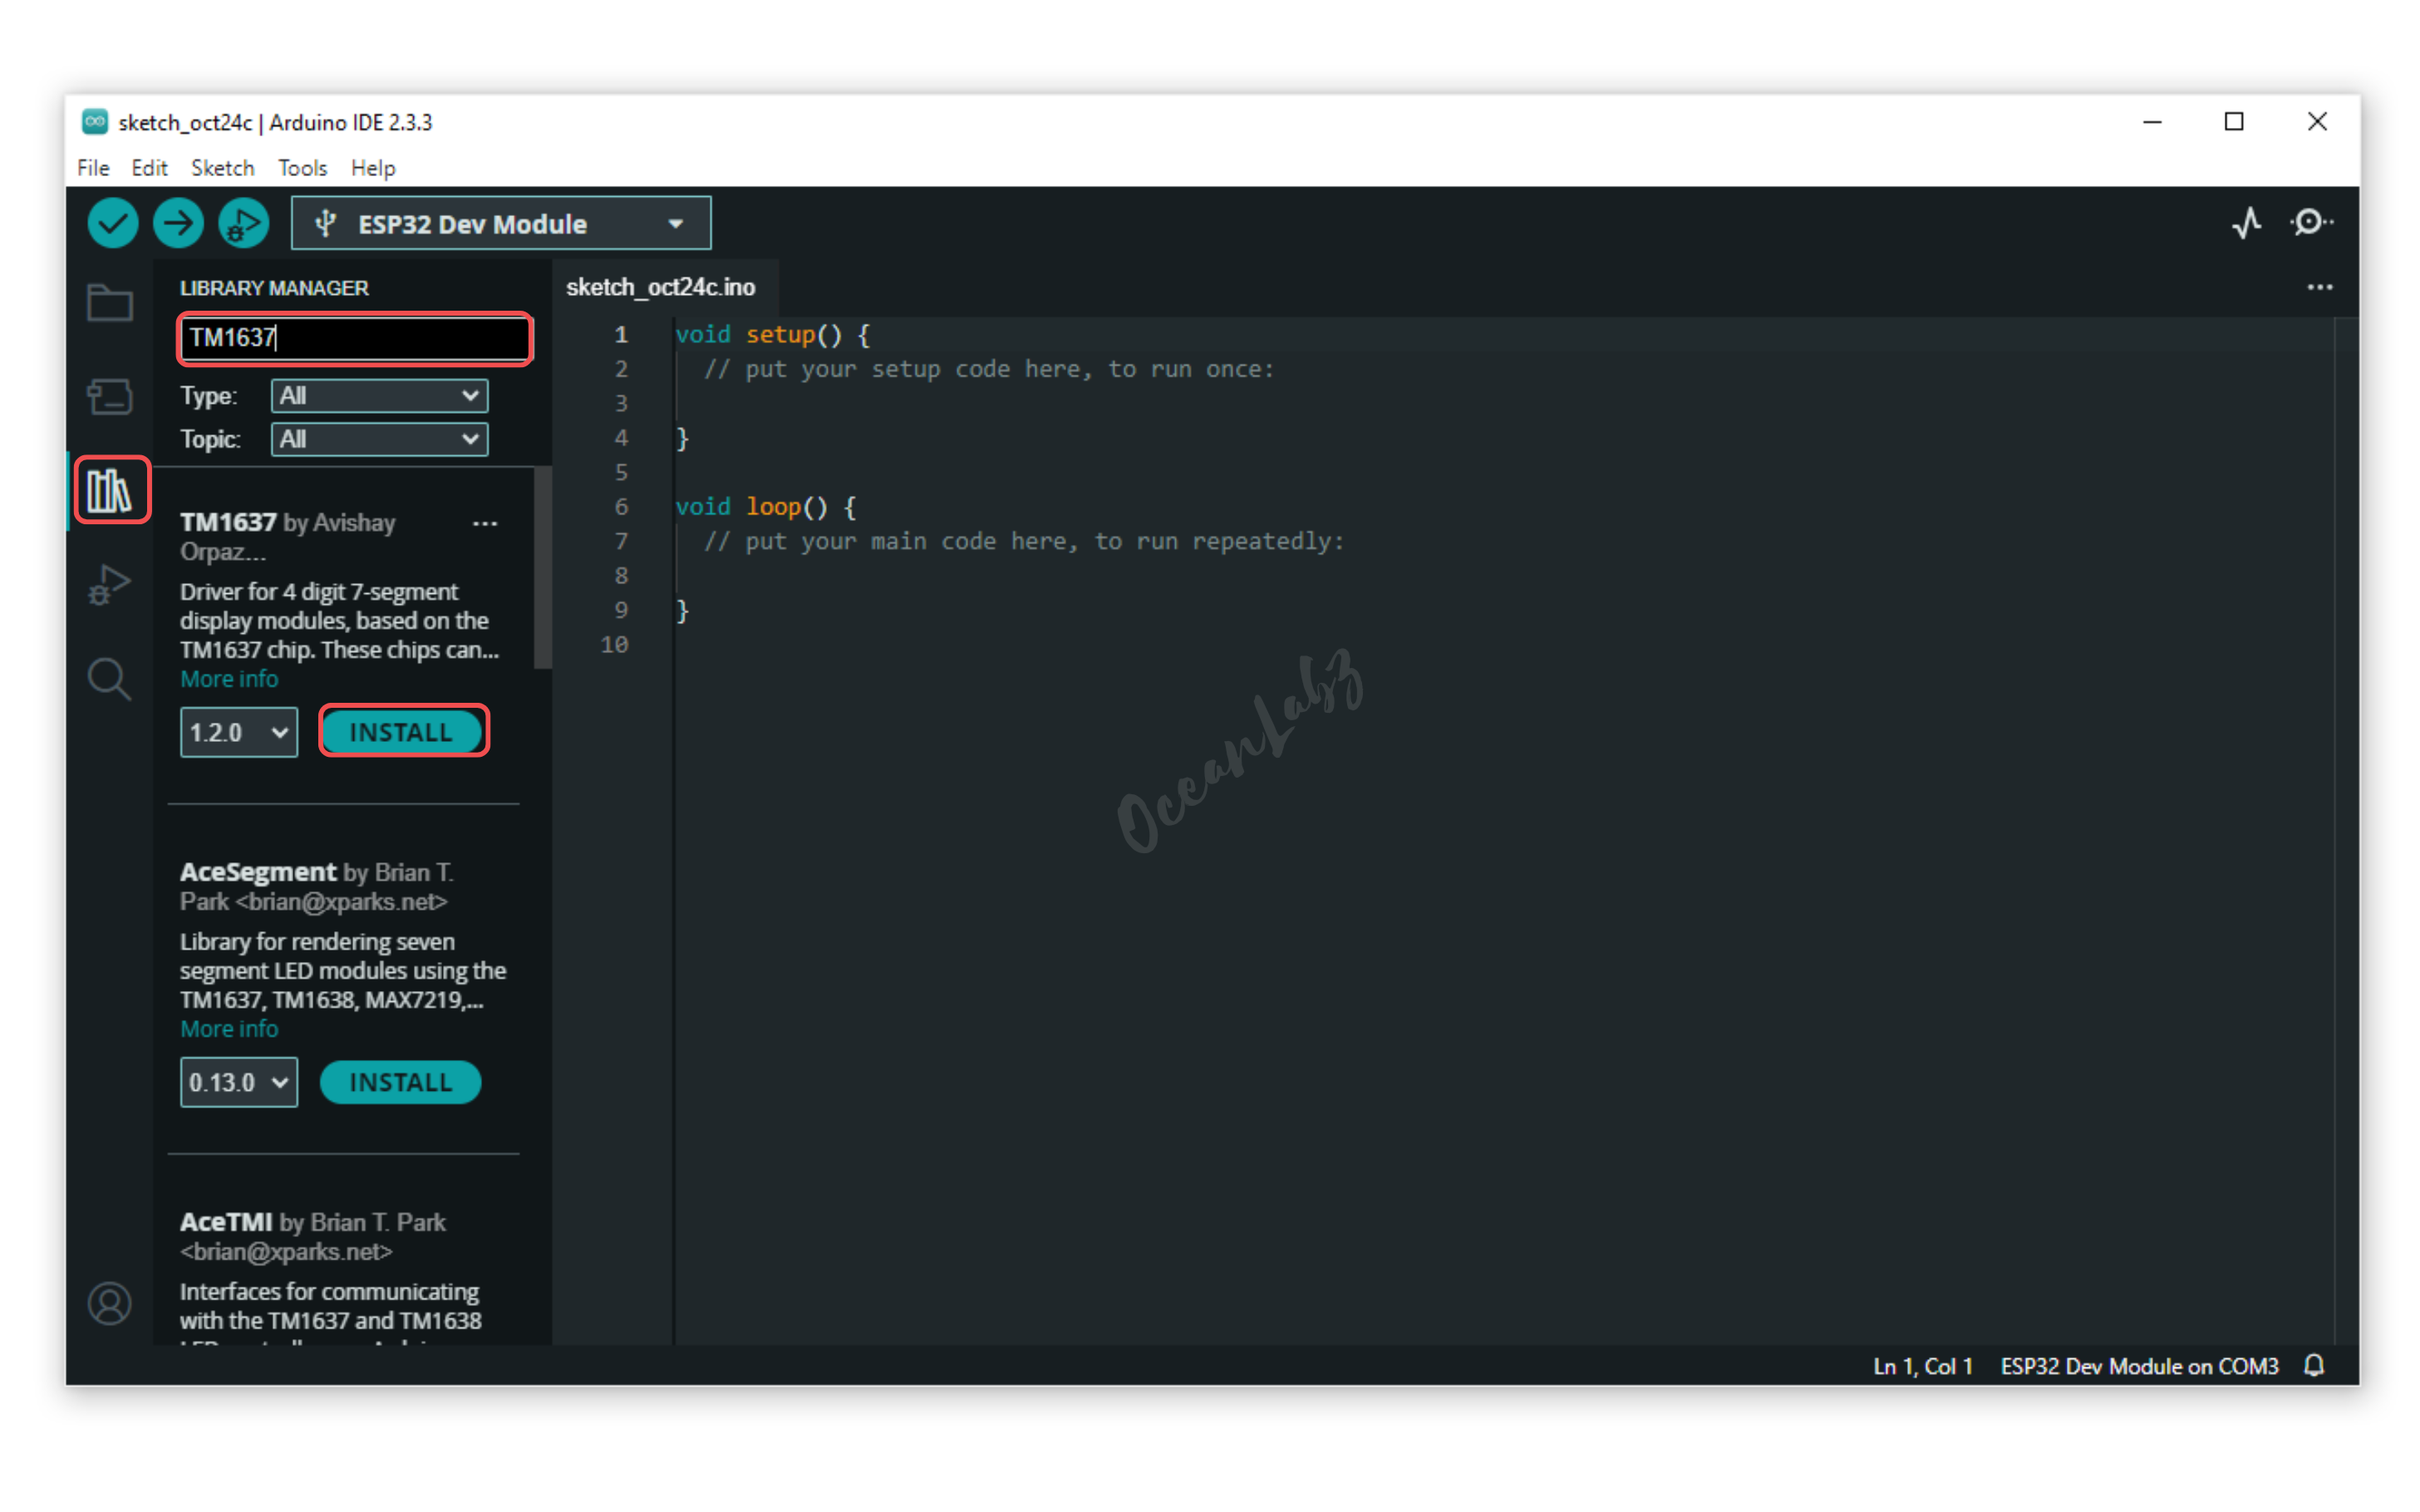
- Go to the “Libraries” tab on the left-hand side of the screen.
- Click on the “Library Manager” button (book icon) at the top of the Libraries tab.
- In the Library Manager window, type “TM1637” in the search bar.
- Locate the “TM1637” library click on the “Install” button next to it.
- Wait for the library to be installed, and you’re ready to use the TM1637 library in your projects.
- Use the following code
#include <TM1637Display.h>

// Define the connection pins for the display
#define CLK 3
#define DIO 2

// Create an instance of the TM1637Display library
TM1637Display display(CLK, DIO);

// Set the countdown time in seconds
int countdownTime = 180; // 3 minutes (180 seconds)

void setup() {
  // Set the brightness of the display (0-7)
  display.setBrightness(5);
}

void loop() {
  // If the countdown has ended, show "0000" and stop the timer
  if (countdownTime <= 0) {
    display.showNumberDec(0, true);
    return; // Stop the timer
  }

  // Calculate minutes and seconds
  int minutes = countdownTime / 60;
  int seconds = countdownTime % 60;

  // Format the time as MM:SS
  int timeToShow = (minutes * 100) + seconds;

  // Display the time
  display.showNumberDecEx(timeToShow, 0b01000000, true); // The 0b01000000 lights up the colon

  // Wait for 0.1 seconds (very fast countdown)
  delay(100);

  // Decrement the countdown time
  countdownTime--;
}
Explanation of the Code
- The code initializes a countdown timer starting from 3 minutes (180 seconds).
- It uses a TM1637 4-digit display to show the remaining time in minutes and seconds (MM:SS format).
- The countdown updates every 0.1 seconds, reducing the time displayed.
- When the countdown reaches zero, it displays “0000” and stops.
Arduino Projects:
Arduino project 1- Creating a clock with TM1637Display and DS3231 (RTC)
This project uses the DS3231 RTC module and a TM1637 display to show the current time in HH:MM format. The time updates every second and adjusts automatically if the RTC loses power. It is a simple and accurate clock system using Arduino.
Required Components
- Arduino UNO
- 4-Digit 7-Segment Display module (TM1637-based)
- DS3231 (RTC) Module
- Jumper wires
- Breadboard
Circuit Diagram / Wiring
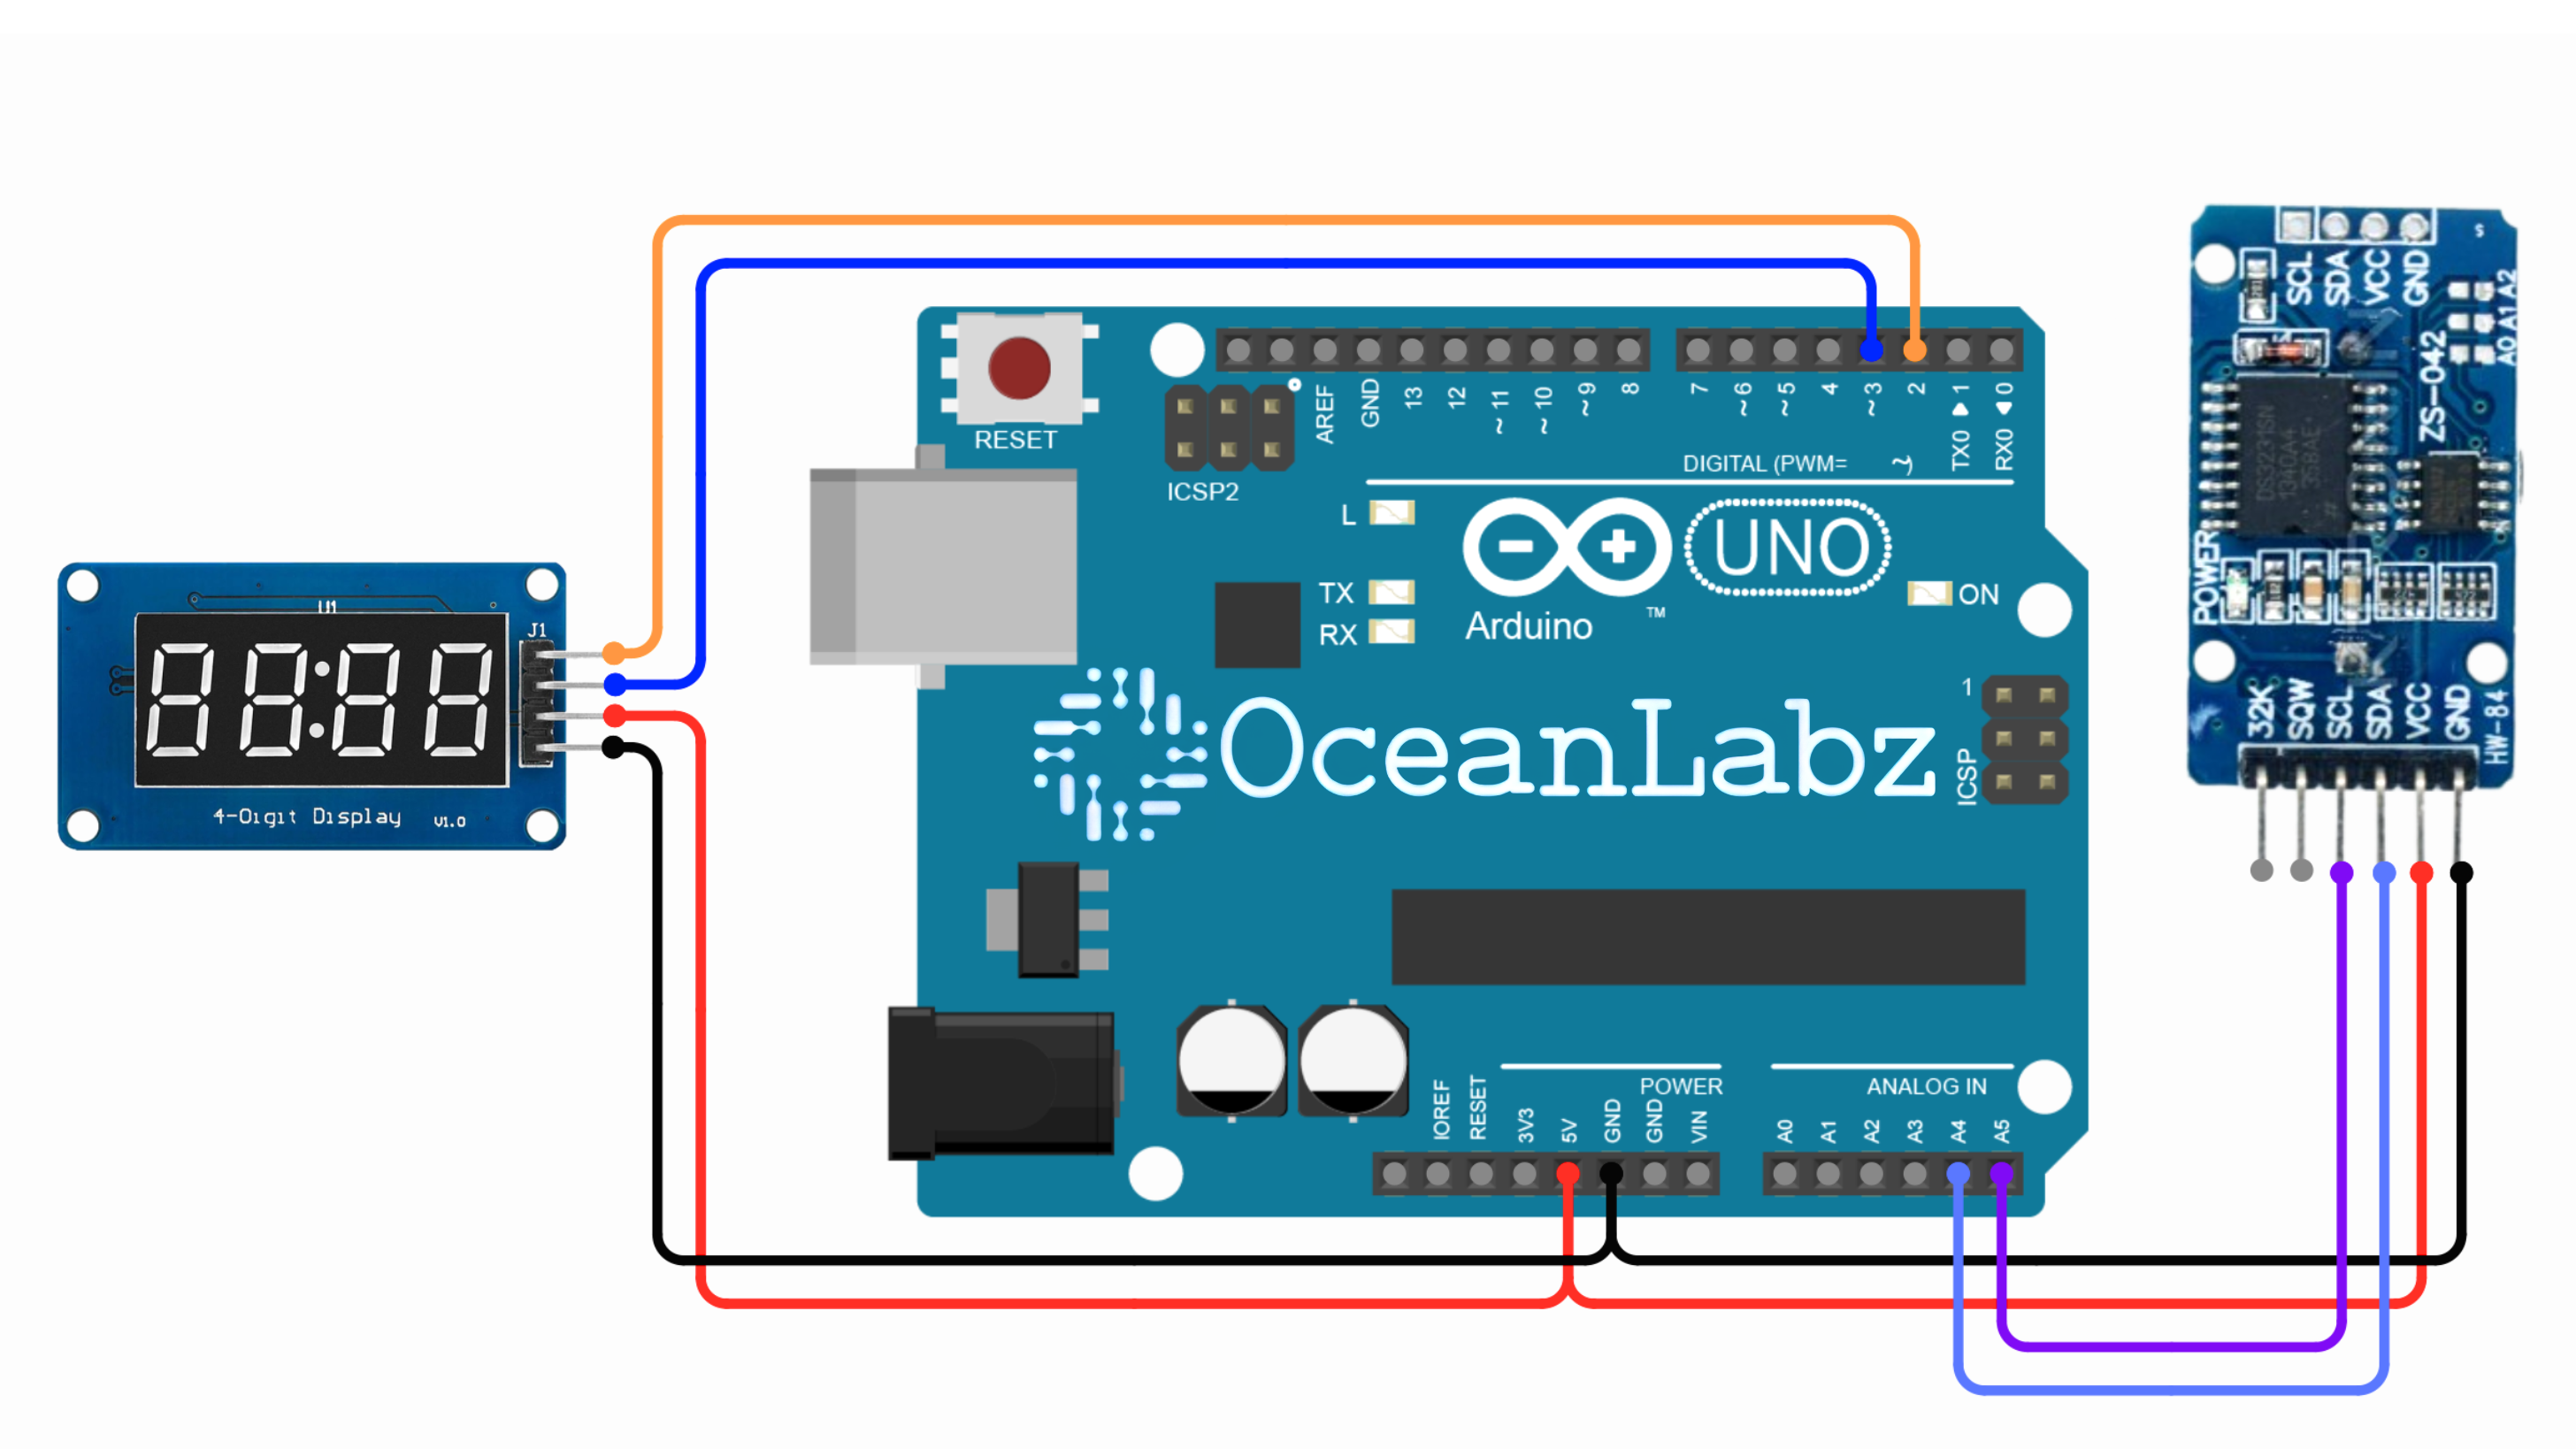
- DS3231 RTC Module to Arduino:
- VCC → 5V (Arduino)
- GND → GND (Arduino)
- SDA → A4 (Arduino)
- SCL → A5 (Arduino)
- TM1637 4-digit Display to Arduino:
- CLK (Clock Pin) → Pin 2 (Arduino)
- DIO (Data Pin) → Pin 3 (Arduino)
- VCC → 5V (Arduino)
- GND → GND (Arduino)
Arduino Code
Make sure you have the required libraries installed:
- RTClib library for (RTC).
- TM1637Display library for Display
#include <Wire.h>
#include <RTClib.h>
#include <TM1637Display.h>

// DS3231 RTC setup
RTC_DS3231 rtc;

// TM1637 setup
#define CLK 2
#define DIO 3
TM1637Display display(CLK, DIO);

void setup() {
  Wire.begin();
  display.setBrightness(7); // Set display brightness (0-7)

  if (!rtc.begin()) {
    Serial.println("RTC not found!");
    while (1);
  }

  if (rtc.lostPower()) {
    rtc.adjust(DateTime(F(__DATE__), F(__TIME__))); // Set time from compile time
  }
}

void loop() {
  DateTime now = rtc.now(); // Get current time

  // Display time in HH:MM format
  int hour = now.hour();
  int minute = now.minute();
  display.showNumberDecEx(hour * 100 + minute, 0b01000000, true);

  delay(1000); // Update every second
}
Explanation
- RTC Module: Provides real-time clock data with accurate timekeeping.
- TM1637 Display: Shows the current time in
HH:MMformat with a colon separator. - I2C Communication: Used to fetch time from DS3231 to display on TM1637.
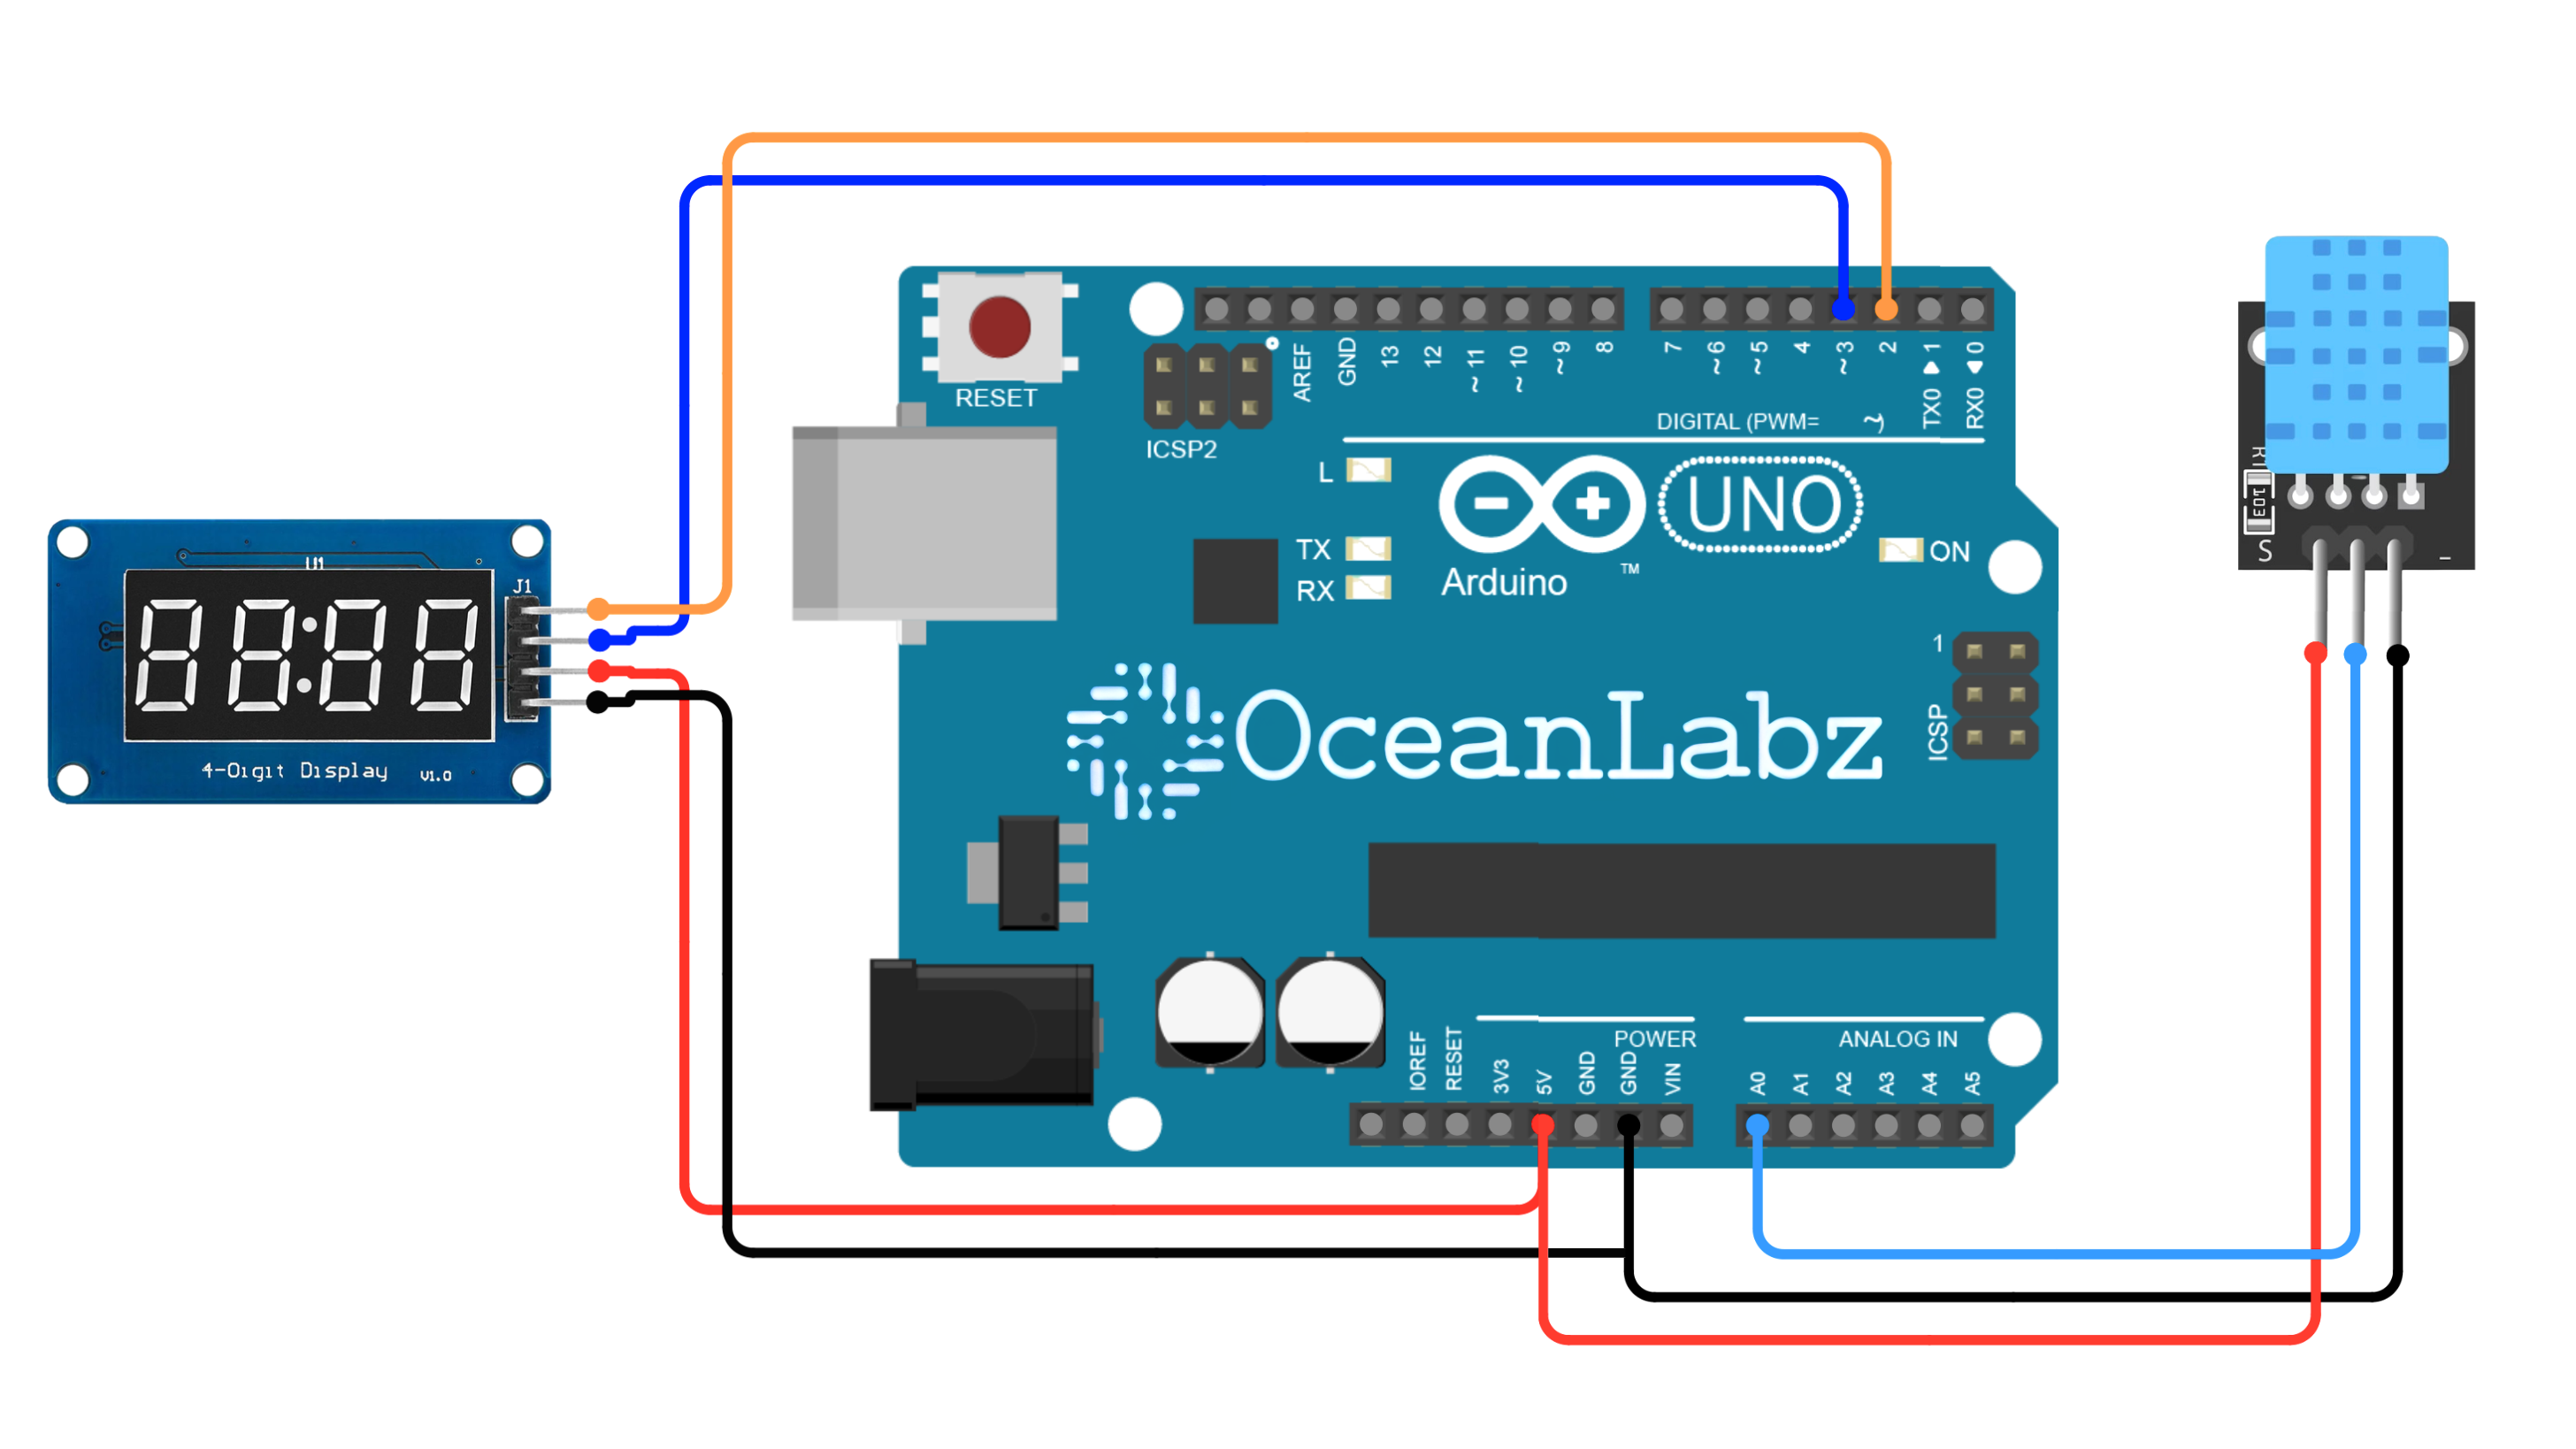
Arduino project 2- Creating a Thermometer with TM1637 and DHT11
This project utilizes a TM1637 4-digit 7-segment display and a DHT11 temperature and humidity sensor to create a basic thermometer. The thermometer will measure the ambient temperature and display the value on the TM1637 display.
Required Components
- Arduino UNO
- 4-Digit 7-Segment Display module (TM1637-based)
- DHT11 Temperature and Humidity Sensor
- Jumper wires
- Breadboard
Circuit Diagram / Wiring
- TM1637 4-digit Display to Arduino:
- CLK (Clock Pin) → Pin 2 (Arduino)
- DIO (Data Pin) → Pin 3 (Arduino)
- VCC → 5V (Arduino)
- GND → GND (Arduino)
- DHT11 Sensor to Arduino:
- VCC → 5V (Arduino)
- GND → GND (Arduino)
- DATA → A0 (Arduino)
Arduino Code
Make sure you have the required libraries installed:
- SimpleDHT library for DHT11 sensor.
- TM1637Display library for Display
#include <SimpleDHT.h>
#include <TM1637Display.h>

// Define the pin connected to DHT11
#define DHTPIN A0
SimpleDHT11 dht11;

// TM1637 pin definitions
#define CLK 2  // TM1637 CLK pin
#define DIO 3  // TM1637 DIO pin

// Initialize the TM1637 display
TM1637Display display(CLK, DIO);

void setup() {
  Serial.begin(9600);
  Serial.println("DHT11 with TM1637 Display");

  // Set display brightness (0 to 7)
  display.setBrightness(5);
}

void loop() {
  int err;
  byte temperature = 0;
  byte humidity = 0;

  // Read the DHT11 sensor
  if ((err = dht11.read(DHTPIN, &temperature, &humidity, NULL)) != 0) {
    Serial.print("Read DHT11 failed, err=");
    Serial.println(err);
    display.showNumberDec(8888, false); // Show error on the display
    delay(1000);
    return;
  }

  // Print temperature and humidity to the Serial Monitor
  Serial.print("Humidity: ");
  Serial.print((int)humidity);
  Serial.print(" %\t");
  Serial.print("Temperature: ");
  Serial.print((int)temperature);
  Serial.println(" °C");

  // Display temperature on TM1637
  display.showNumberDec((int)temperature, false, 2, 0); // Show temp on the first 2 digits
  display.showNumberDec((int)humidity, false, 2, 2);   // Show humidity on the last 2 digits

  delay(2000); // Wait a few seconds between readings
}
Explanation
- The code integrates a TM1637 4-digit display to show real-time temperature and humidity readings from a DHT11 sensor.
- Temperature is displayed on the first two digits, and humidity on the last two.
- An error code (
8888) is shown on the display if the sensor fails to read data. - The display brightness is adjustable, ensuring clear visibility.
Testing and Troubleshooting
- If the display does not light up, check all connections.
- Make sure the correct pins are used for
CLKandDIO. - Use the Serial Monitor to debug the code and test values.


