Index
Introduction

The BME280 is a popular environmental sensor that is used to measure temperature, pressure, and humidity. This sensor is widely used in various electronic projects, such as weather stations, indoor climate control systems, and IoT devices. In this blog, we will discuss what the BME280 sensor is, how it works, its technical specifications, and how to interface it with an Arduino.
The BME280 sensor is a small integrated circuit (IC) that combines a humidity sensor, pressure sensor, and temperature sensor into a single package. This sensor is designed to provide accurate environmental data, making it ideal for various applications, such as weather monitoring, indoor climate control, and air quality monitoring.
Working Principle
The BME280 sensor works by using a microelectromechanical system (MEMS) to measure changes in temperature, pressure, and humidity. The humidity sensor measures the amount of moisture in the air, while the pressure sensor measures atmospheric pressure. The temperature sensor measures the ambient temperature. These three measurements are combined to calculate the relative humidity, pressure, and temperature.
Application
- Weather monitoring and forecasting.
- Indoor climate control and HVAC systems.
- IoT applications and remote environmental monitoring.
- Altitude measurement and navigation systems.
- Health and wellness devices.
- Industrial automation and process monitoring.
Technical Specifications
The following are the technical specifications of the BME280 sensor module:
- Range: Measures humidity from 0% to 100% relative humidity (RH).
- Accuracy: Provides readings typically within ±2% to ±5% RH accuracy.
- Resolution: Offers a resolution of around 1% RH.
- Operating Voltage: Supports operation at 3.3V to 5V.
- Operating Temperature Range: Functions in temperatures ranging from -40°C to +125°C for temperature and 0°C to 60°C for humidity.
- Output Interface: Utilizes a digital output, often via single-wire, I2C, or SPI interface.
- Response Time: Delivers readings with a response time typically within a few seconds.
- Power Consumption: Exhibits low power consumption suitable for battery-powered applications.
- Additional Features: Some sensors may include integrated temperature measurement and calibration capabilities.
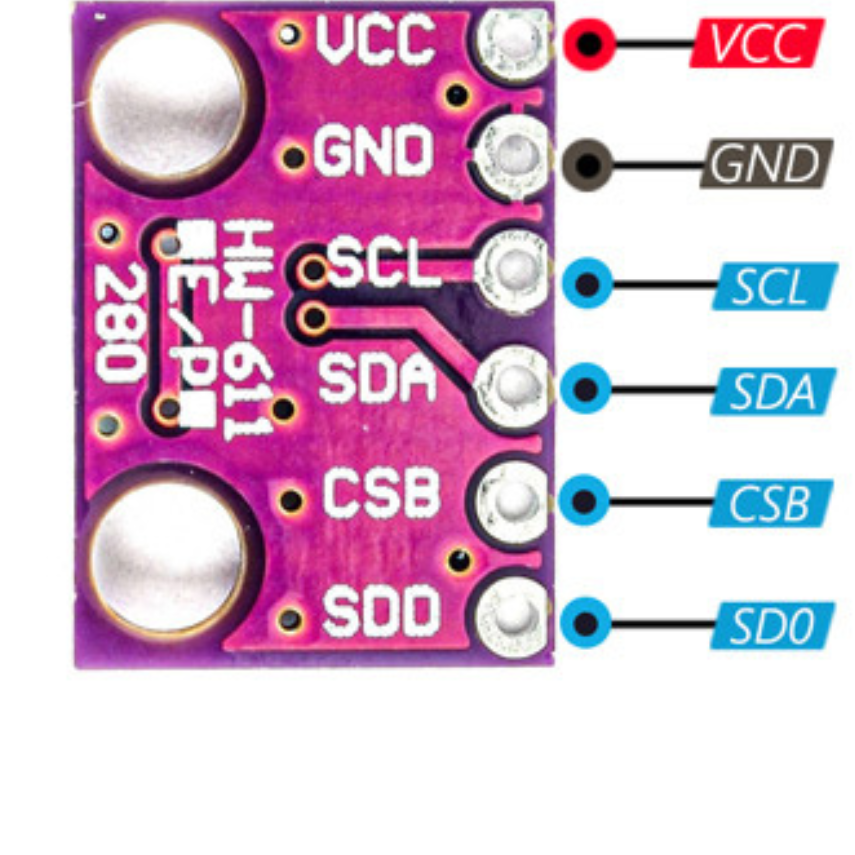
Pinout

1. VCC: Power supply (3.3V)
2. GND: Ground
3. SCL: Serial clock line (I2C communication bus)
4. SDA: Serial data line (I2C communication bus)
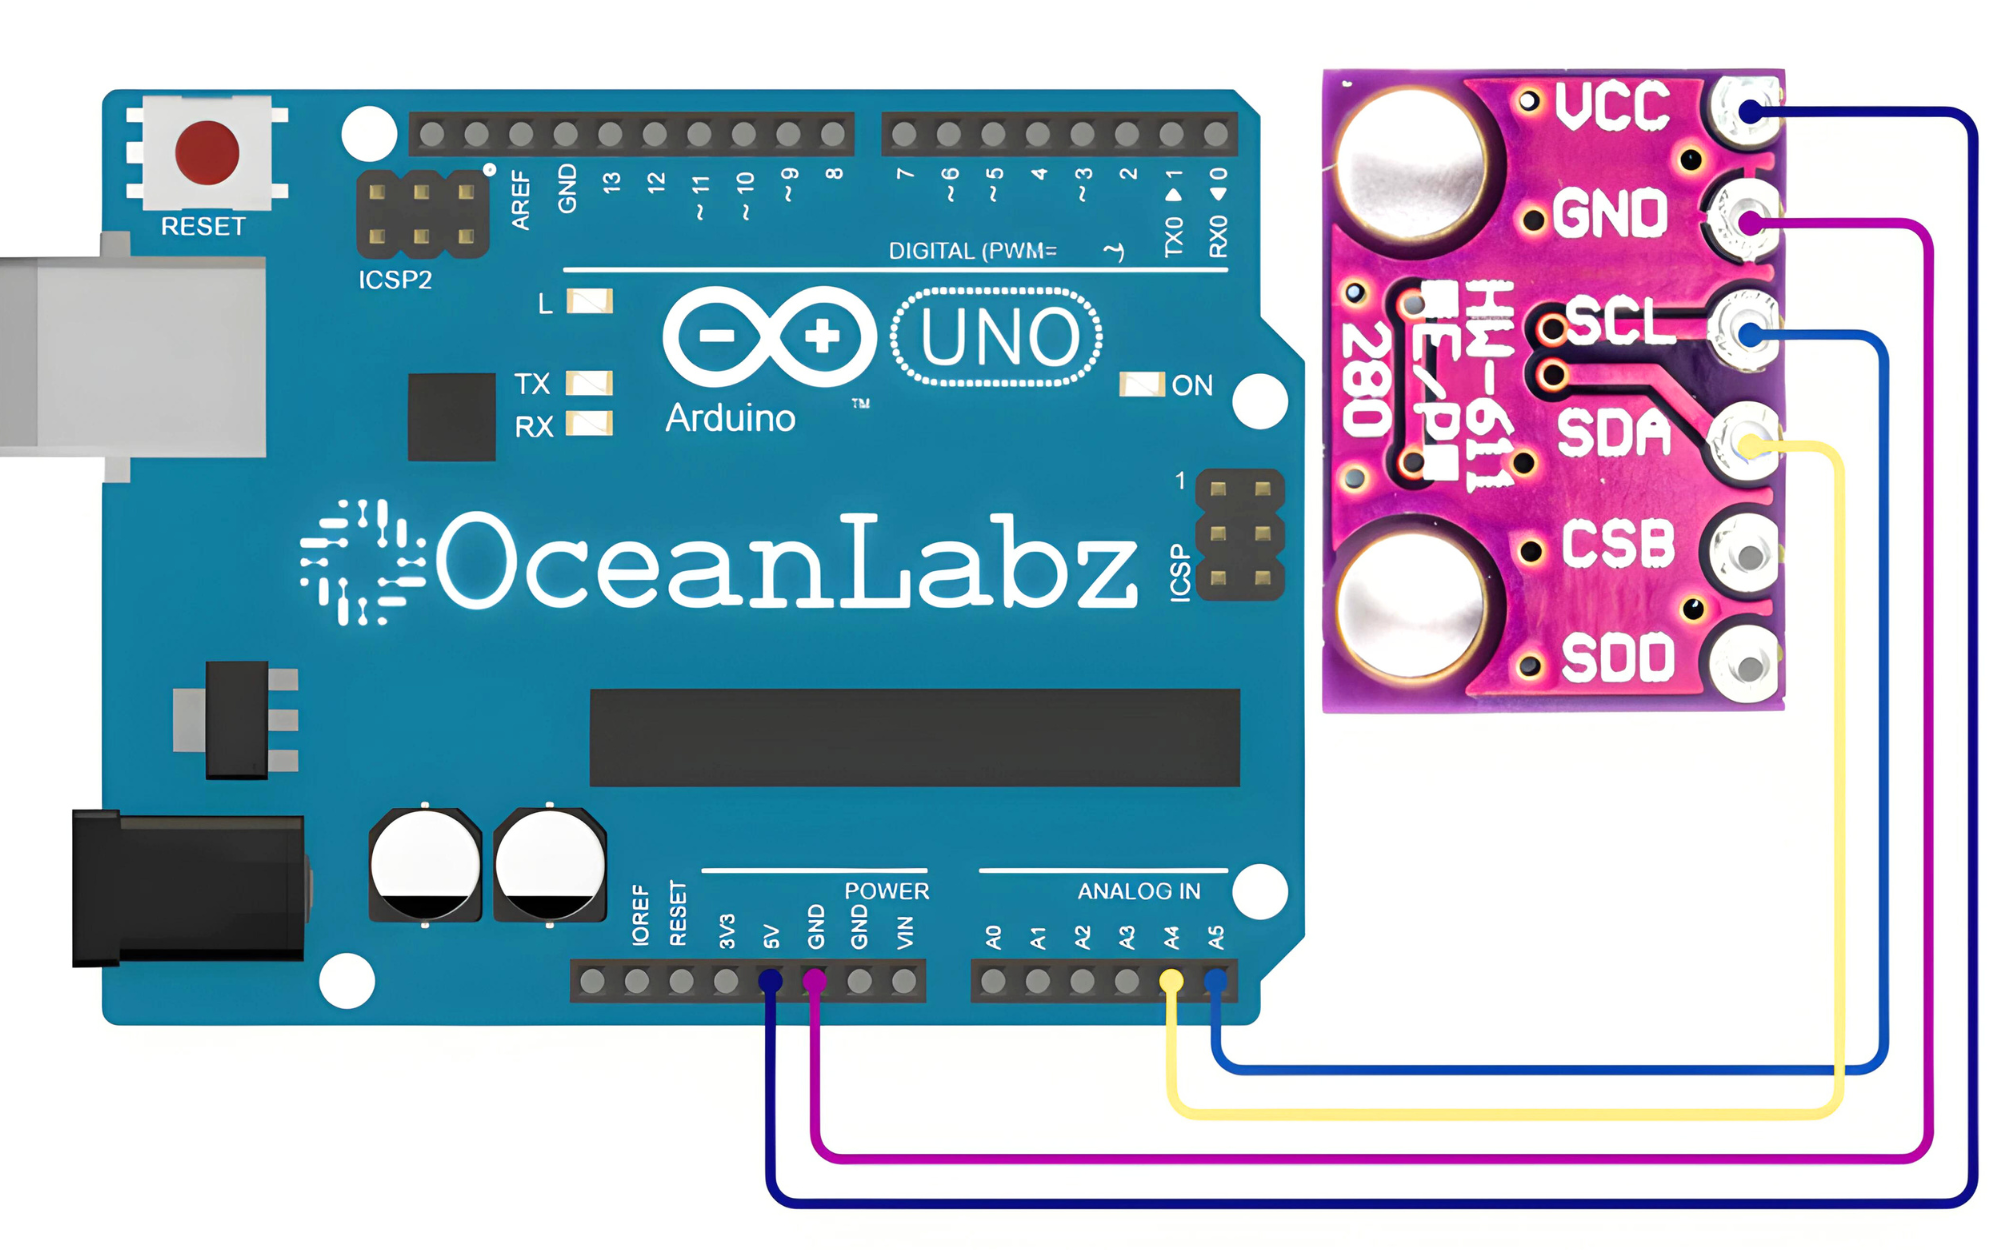
Circuit Diagram
| BMP280 Pin | Arduino Pin |
| VCC | 5 V |
| GND | GND |
| SDA | Analog A4 |
| SCL | Analog A5 |

Programming With Arduino
Step 1: Install the Required Library
The Wire library is included by default with the Arduino IDE, so you do not need to install it separately.
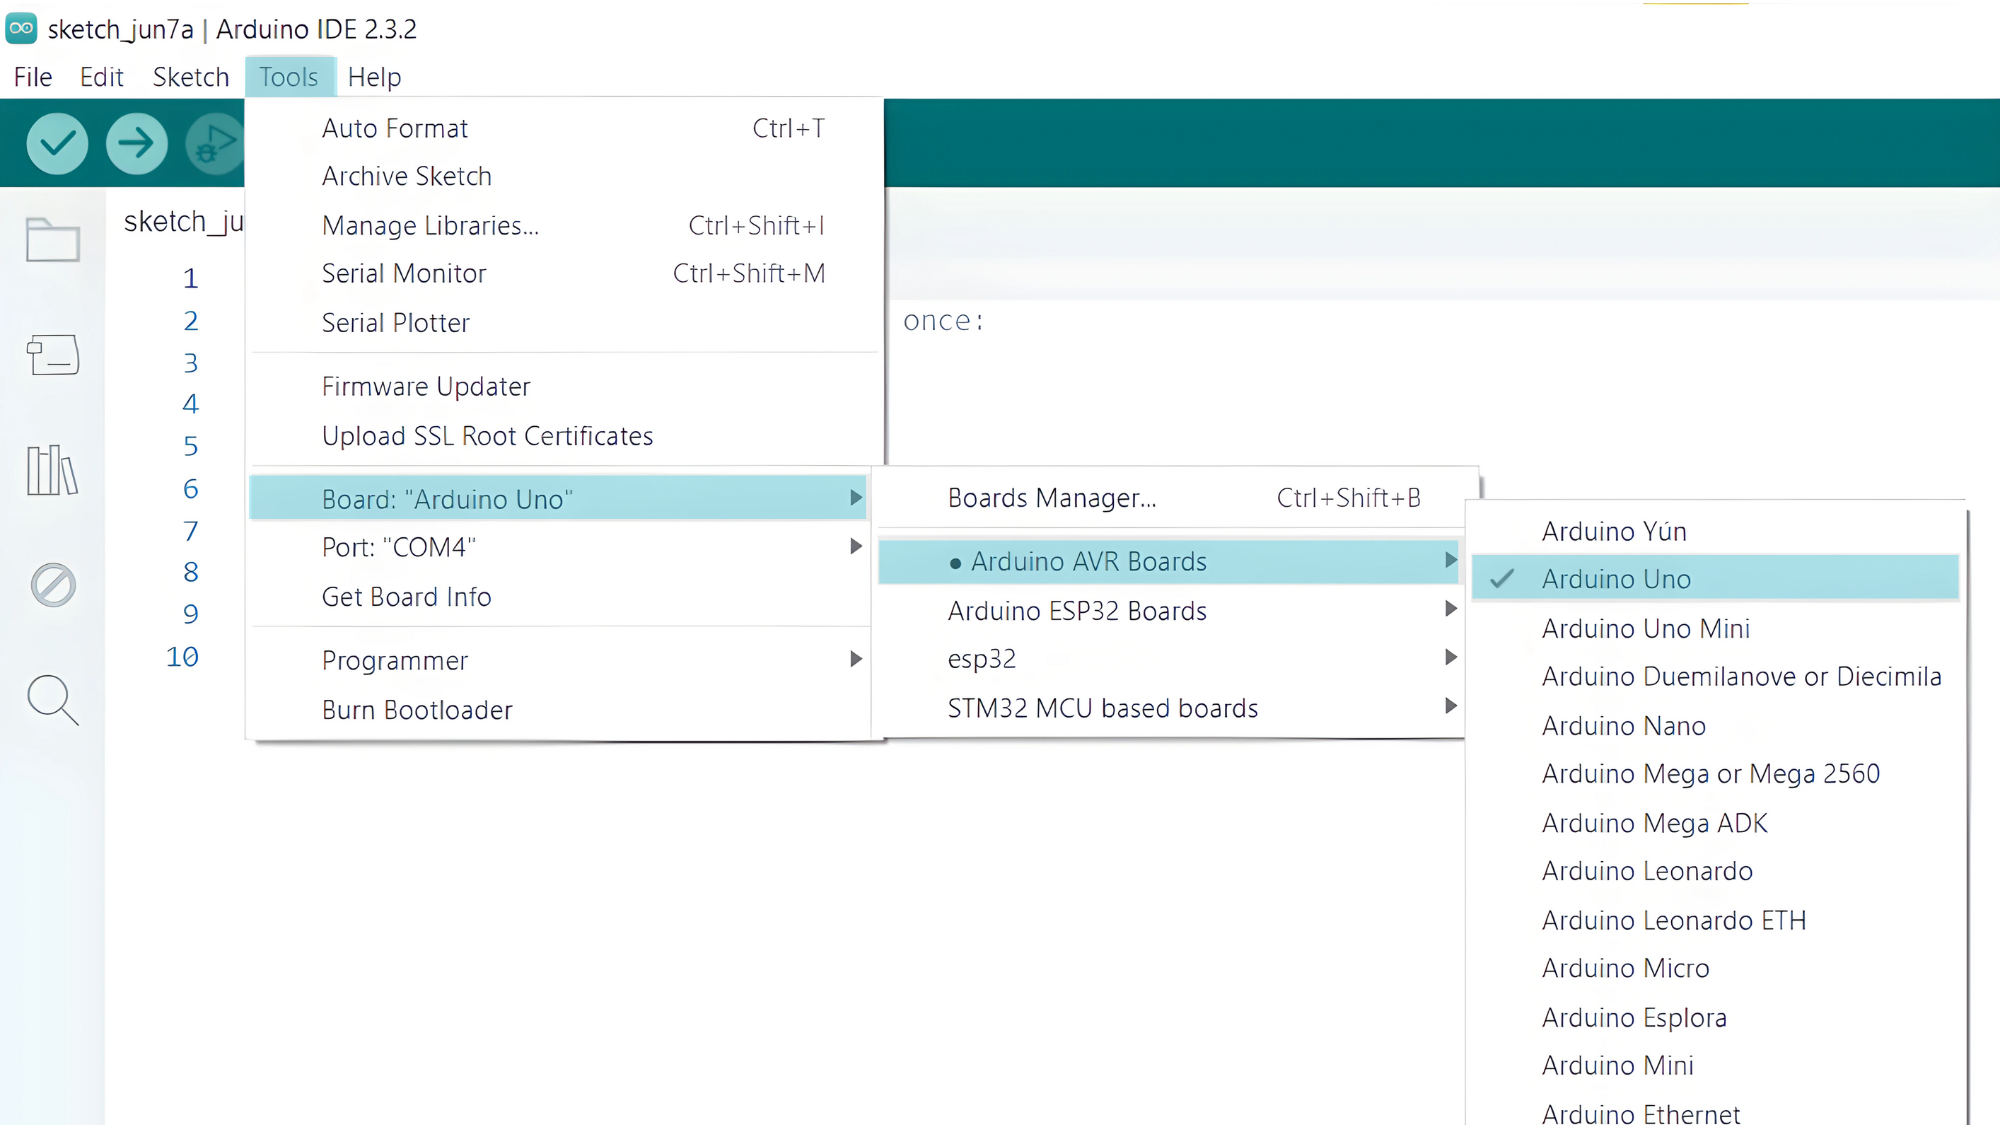
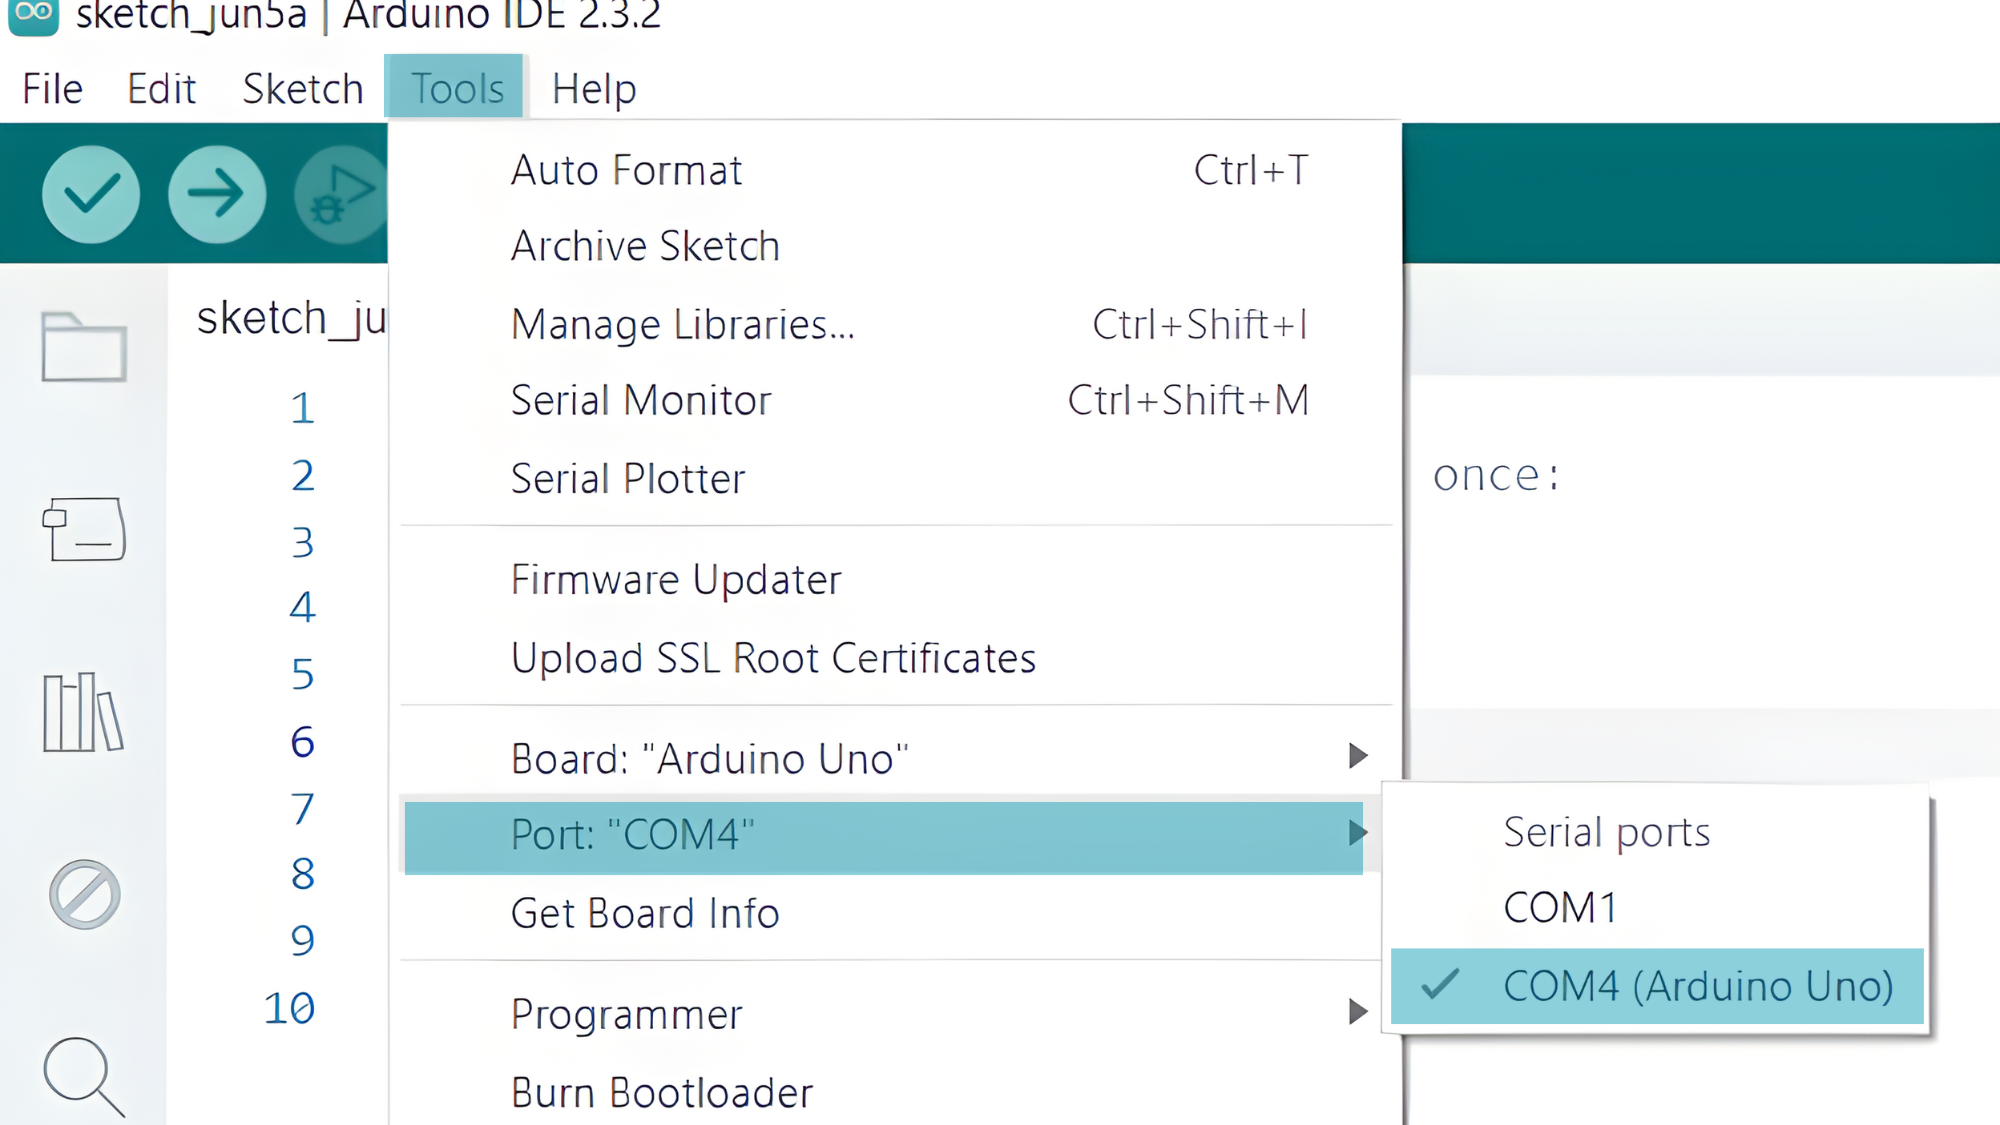
Step 2: Select the appropriate board and port
- Go to Tools > Board and select your Arduino board (e.g., Arduino Uno).

- Go to Tools > Port and select the port to which your Arduino is connected.

Step 3: Upload the Code
- Copy the provided code into your Arduino IDE.
#include <Wire.h>

#define BMP280_ADDR 0x76 // I2C address of BMP280 sensor (can be 0x76 or 0x77 depending on the sensor)

void setup() {
  Serial.begin(9600);
  Wire.begin(); // Initialize I2C communication

  // Initialize BMP280 sensor
  Wire.beginTransmission(BMP280_ADDR);
  Wire.write(0xF4); // Select Control Register
  Wire.write(0x27); // 0x27 = Temperature oversampling x1, Pressure oversampling x1, Normal mode
  Wire.endTransmission();
}

void loop() {
  // Read temperature and pressure data from BMP280 sensor
  float temperature = readBMP280Temperature();
  float pressure = readBMP280Pressure();

  // Display temperature and pressure readings
  Serial.print("Temperature: ");
  Serial.print(temperature);
  Serial.println(" °C");

  Serial.print("Pressure: ");
  Serial.print(pressure);
  Serial.println(" hPa");

  delay(2000); // Delay before next reading
}

float readBMP280Temperature() {
  Wire.beginTransmission(BMP280_ADDR);
  Wire.write(0xFA); // Select Temperature data register
  Wire.endTransmission();

  Wire.requestFrom(BMP280_ADDR, 3); // Request 3 bytes of data
  byte msb = Wire.read();
  byte lsb = Wire.read();
  byte xlsb = Wire.read();

  int rawTemperature = (msb << 12) | (lsb << 4) | (xlsb >> 4);
  float temp = compensateTemperature(rawTemperature);
  return temp;
}

float readBMP280Pressure() {
  Wire.beginTransmission(BMP280_ADDR);
  Wire.write(0xF7); // Select Pressure data register
  Wire.endTransmission();

  Wire.requestFrom(BMP280_ADDR, 3); // Request 3 bytes of data
  byte msb = Wire.read();
  byte lsb = Wire.read();
  byte xlsb = Wire.read();

  int rawPressure = (msb << 12) | (lsb << 4) | (xlsb >> 4);
  float pressure = compensatePressure(rawPressure);
  return pressure;
}

float compensateTemperature(int rawTemp) {
  double var1, var2, temp;

  var1 = (((double)rawTemp) / 16384.0 - ((double)calibrationData.dig_T1) / 1024.0) * ((double)calibrationData.dig_T2);
  var2 = ((((double)rawTemp) / 131072.0 - ((double)calibrationData.dig_T1) / 8192.0) *
          (((double)rawTemp) / 131072.0 - ((double)calibrationData.dig_T1) / 8192.0)) * ((double)calibrationData.dig_T3);

  temp = var1 + var2;
  temp = temp / 5120.0;

  return temp;
}

float compensatePressure(int rawPressure) {
  double var1, var2, p;

  var1 = ((double)t_fine / 2.0) - 64000.0;
  var2 = var1 * var1 * ((double)calibrationData.dig_P6) / 32768.0;
  var2 = var2 + var1 * ((double)calibrationData.dig_P5) * 2.0;
  var2 = (var2 / 4.0) + (((double)calibrationData.dig_P4) * 65536.0);
  var1 = (((double)calibrationData.dig_P3) * var1 * var1 / 524288.0 + ((double)calibrationData.dig_P2) * var1) / 524288.0;
  var1 = (1.0 + var1 / 32768.0) * ((double)calibrationData.dig_P1);
  p = 1048576.0 - (double)rawPressure;

  if (var1 != 0.0) {
    p = (p - (var2 / 4096.0)) * 6250.0 / var1;
    var1 = ((double)calibrationData.dig_P9) * p * p / 2147483648.0;
    var2 = p * ((double)calibrationData.dig_P8) / 32768.0;
    p = p + (var1 + var2 + ((double)calibrationData.dig_P7)) / 16.0;
  } else {
    return 0.0; // Avoid division by zero
  }

  return p;
}
- Verify and upload the code to your Arduino board.

Step 4: Open the Serial Monitor
- Connect your Arduino to the computer and upload the code.
- Open the Serial Monitor in the Arduino IDE by going to Tools > Serial Monitor or pressing
Ctrl+Shift+M. - Set the baud rate to 9600 in the Serial Monitor.


