Index

Introduction
The MQ-2 gas sensor is an essential tool for detecting gases like LPG, methane, and smoke, making it ideal for safety and air quality projects. It works by measuring changes in electrical resistance based on gas concentration, outputting an analog signal that corresponds to detected levels. This guide will help you connect the MQ-2 to an Arduino and read gas or smoke concentration values accurately.
Safety Warning
This experiment involves detecting gas with the MQ-2 sensor, which may require using a lighter or other gas sources. It is crucial to prioritize safety during this experiment.
- Children should only conduct this activity under the supervision of an adult.
- Keep flammable materials and ignition sources away from the sensor and workspace.
- Always have an adult handle any ignition sources, such as a lighter, to minimize risks.
Required Components
- Arduino Board (e.g., Arduino Uno)
- MQ2 Gas Sensor
- Jumper Wires
- Breadboard (optional)
Pinout

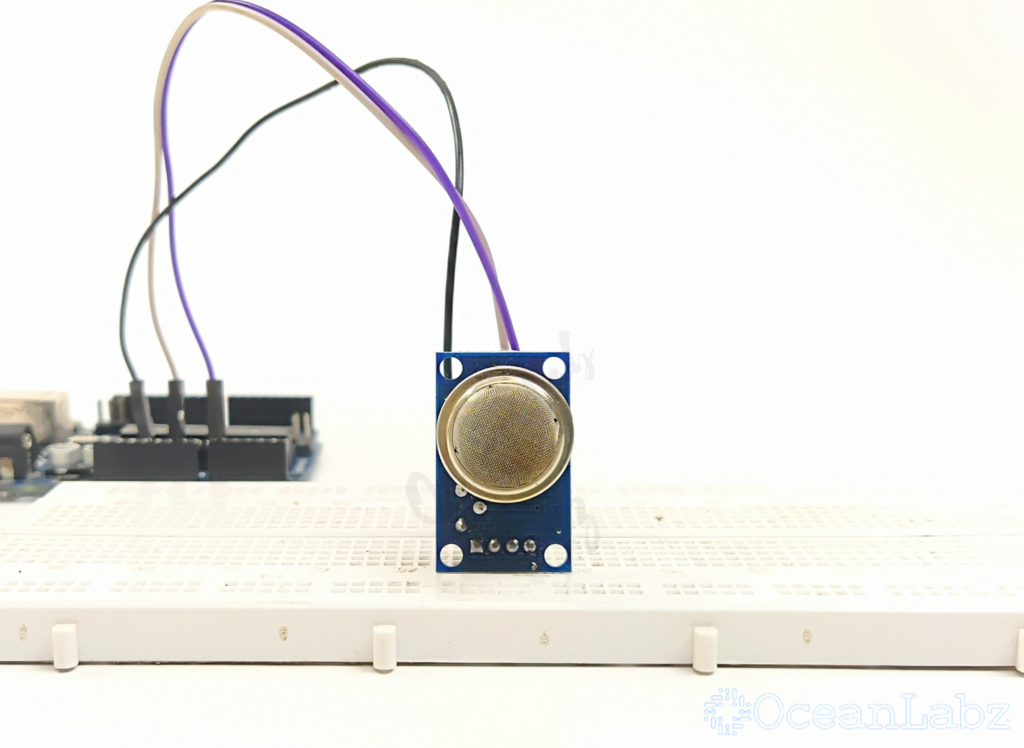
Circuit Diagram / Wiring
- MQ2 SENSOR VCC → 5V (Arduino)
- MQ2 SENSOR GND → GND (Arduino)
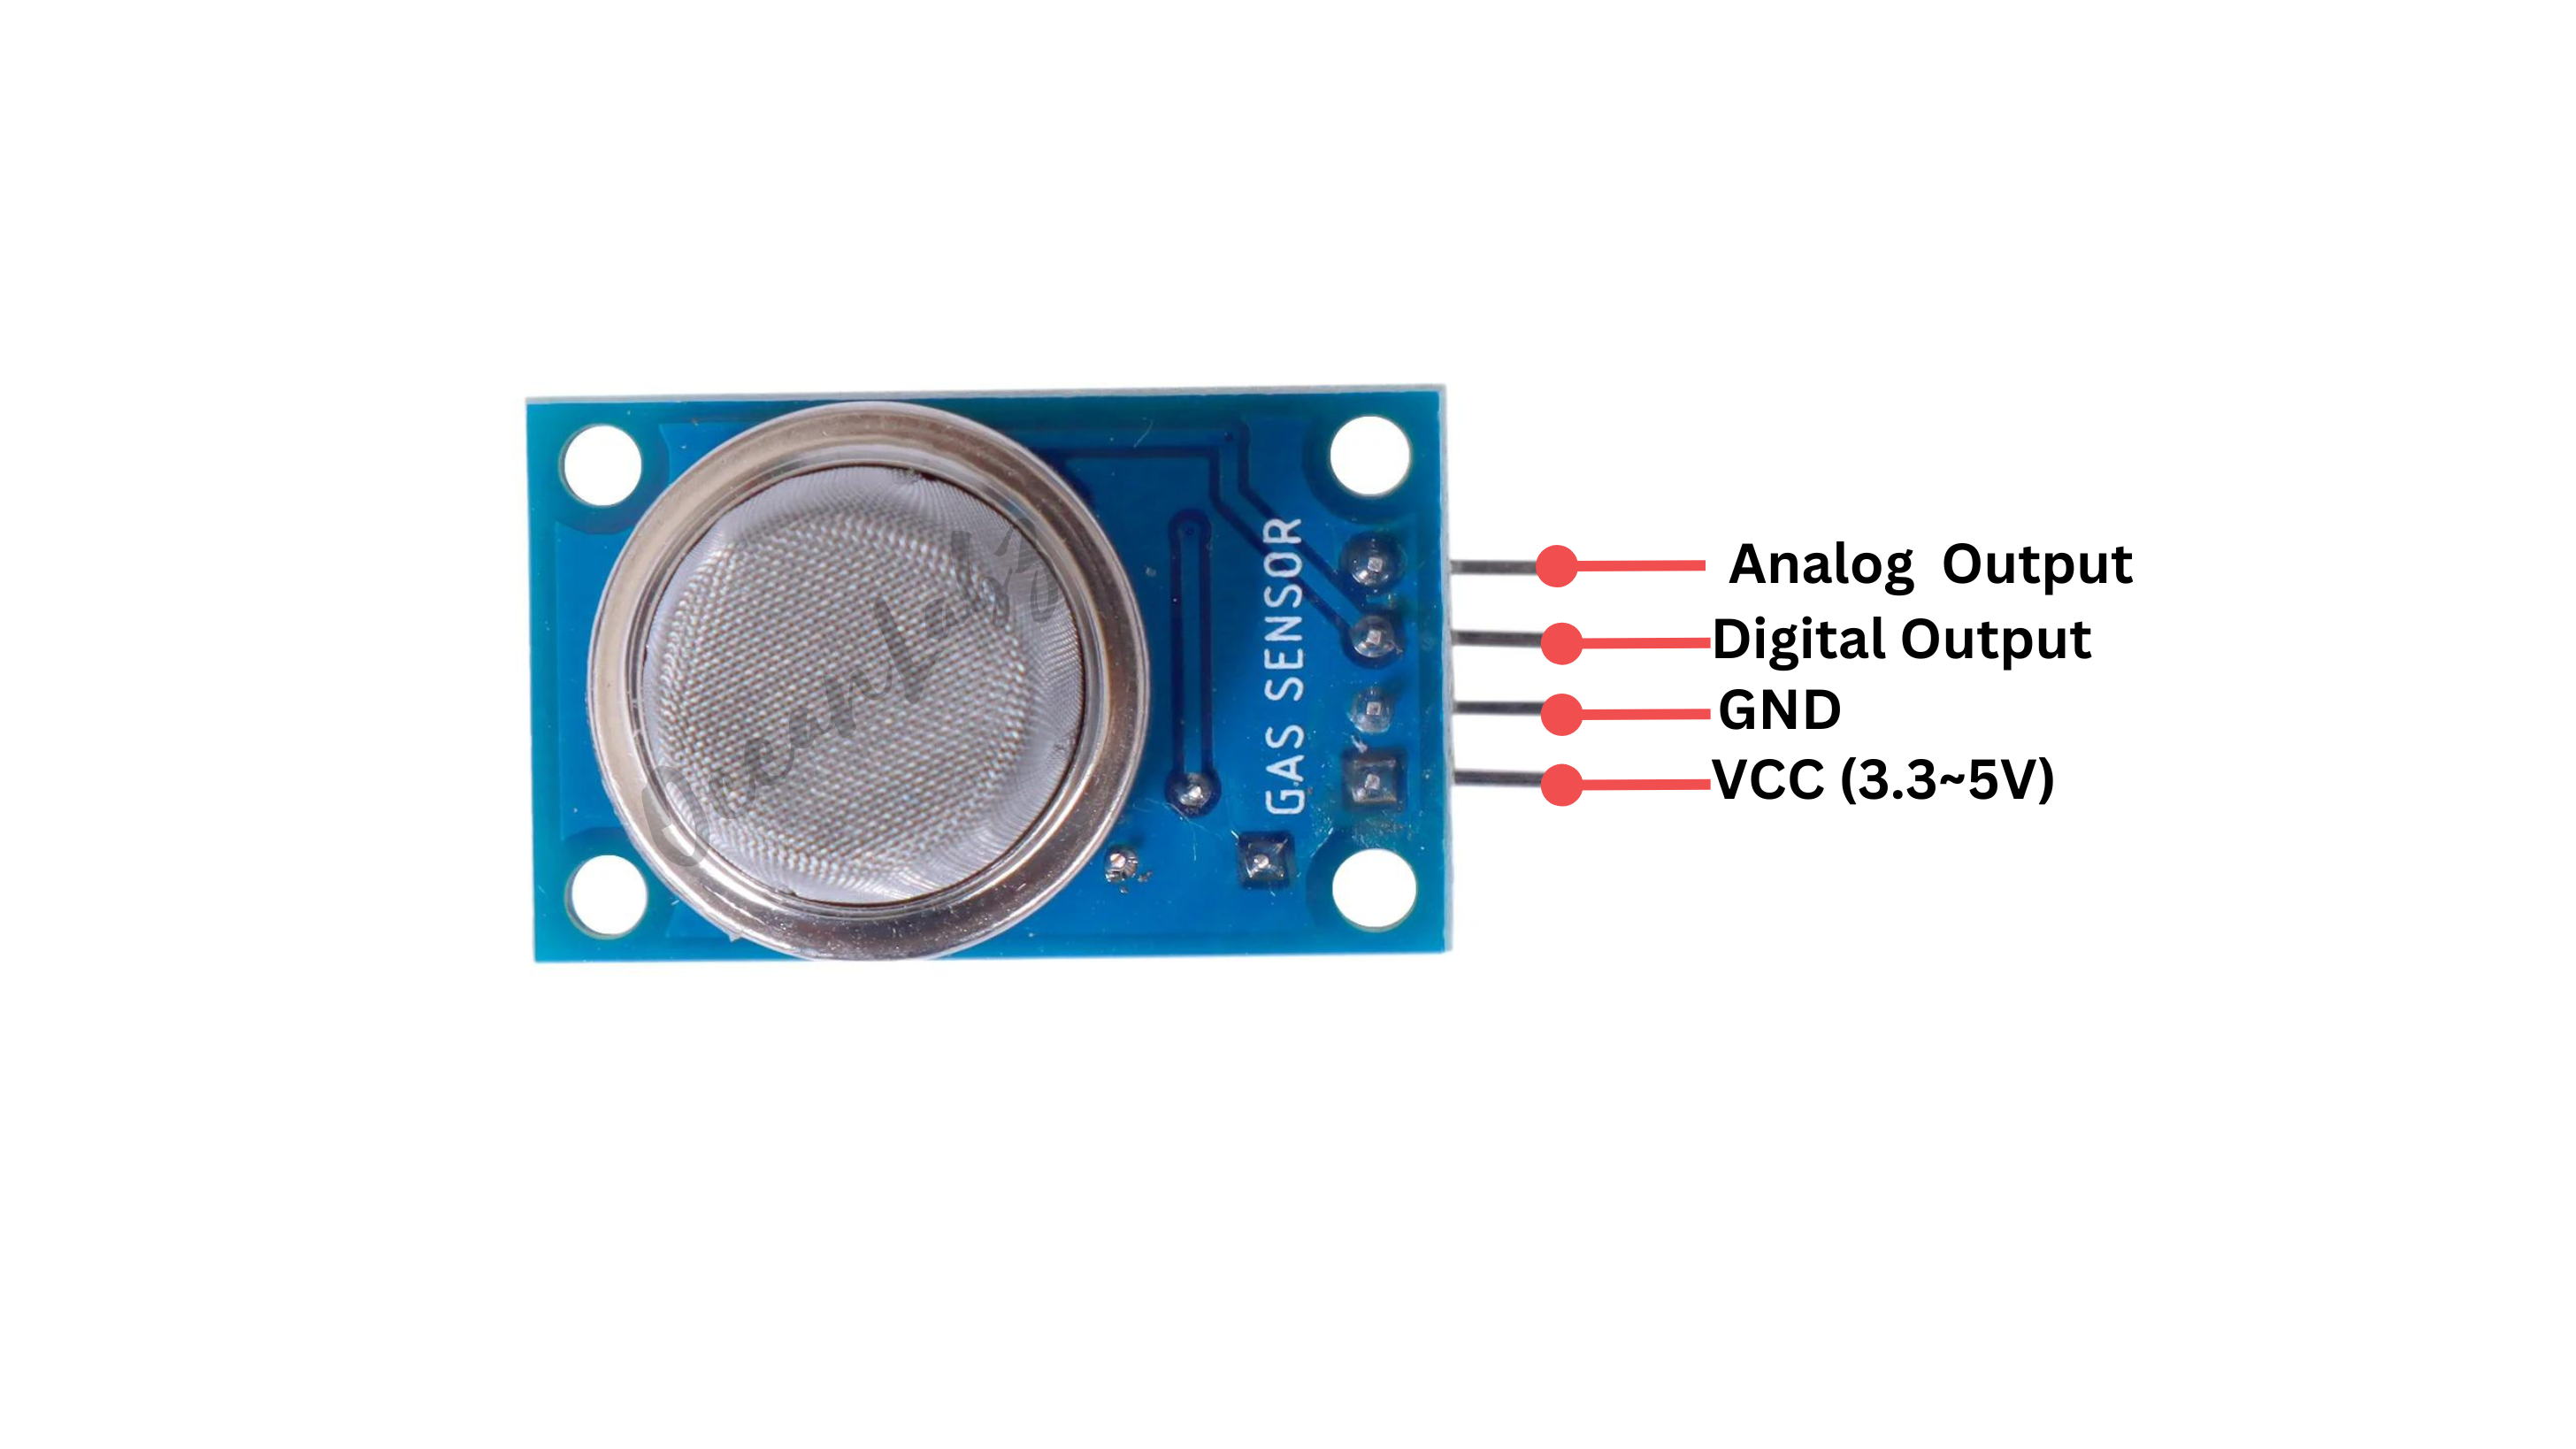
- MQ2 SENSOR AO (Analog Output) → Pin A0 (Arduino)

Programming With Arduino
- Copy the provided code into your Arduino IDE.
// Define the analog pin connected to the MQ-2 sensor
const int mq2Pin = A0; // Analog pin A0 for MQ-2 sensor output
const int detectionThreshold = 600; // Set a threshold value for gas detection

void setup() {
  Serial.begin(9600); // Initialize serial communication
}

void loop() {
  int sensorValue = analogRead(mq2Pin); // Read analog value from MQ-2 sensor

  // Check if the sensor value exceeds the threshold
  if (sensorValue > detectionThreshold) {
    Serial.println("Gas Detected!"); // Print message if gas is detected
  } else {
    Serial.println("No Gas Detected!"); // Print message if no gas is detected
  }

  delay(1000); // Delay before taking the next reading
}
Explanation
mq2Pin: Defines the analog pin connected to the MQ-2 sensor.detectionThreshold: A threshold value set to 300 (you may need to adjust this value based on your calibration and testing).analogRead(mq2Pin): Reads the analog value from the MQ-2 sensor.if (sensorValue > detectionThreshold): Checks if the read sensor value is greater than the threshold to determine gas presence.Serial.println("Gas Detected!"): Prints a message when gas is detected.Serial.println("No Gas Detected!"): Prints a message when no gas is detected.delay(1000): Pauses for 1 second before taking the next reading.
Adjustments
- You may need to adjust the
detectionThresholdbased on your specific sensor’s behavior and the type of gases you want to detect. - Monitor the Serial Monitor output to determine what sensor values correspond to gas presence and adjust the threshold accordingly.
Testing and Troubleshooting
- Verify Connections: Ensure the MQ-2 sensor is properly connected to the Arduino, with VCC, GND, and the analog pin (A0) connected correctly.
- Check Serial Monitor: Open the Serial Monitor to see the gas concentration readings in PPM. If no values appear, check the code and wiring.
- Sensor Calibration: Adjust calibration values like
RS_airandRLfor better accuracy based on specific conditions or gas types. - Voltage Range: If readings seem off, confirm that the analog pin is receiving the expected voltage (0-5V) from the sensor.
Arduino Projects:
Arduino project 1 – Gas Safety Monitoring System MQ2, Buzzer, LEDs
The Gas Detection and Alert System is a safety device designed to detect harmful gases using an MQ-2 sensor. It provides real-time alerts through a buzzer and LEDs, ensuring timely warnings in case of gas leaks. This system is ideal for enhancing safety in homes, industries, and laboratories.
Required Components
- Arduino Board (e.g., Arduino Uno)
- MQ2 Gas Sensor
- Buzzer Module
- LEDs (tow)
- Jumper Wires
- Breadboard (optional)
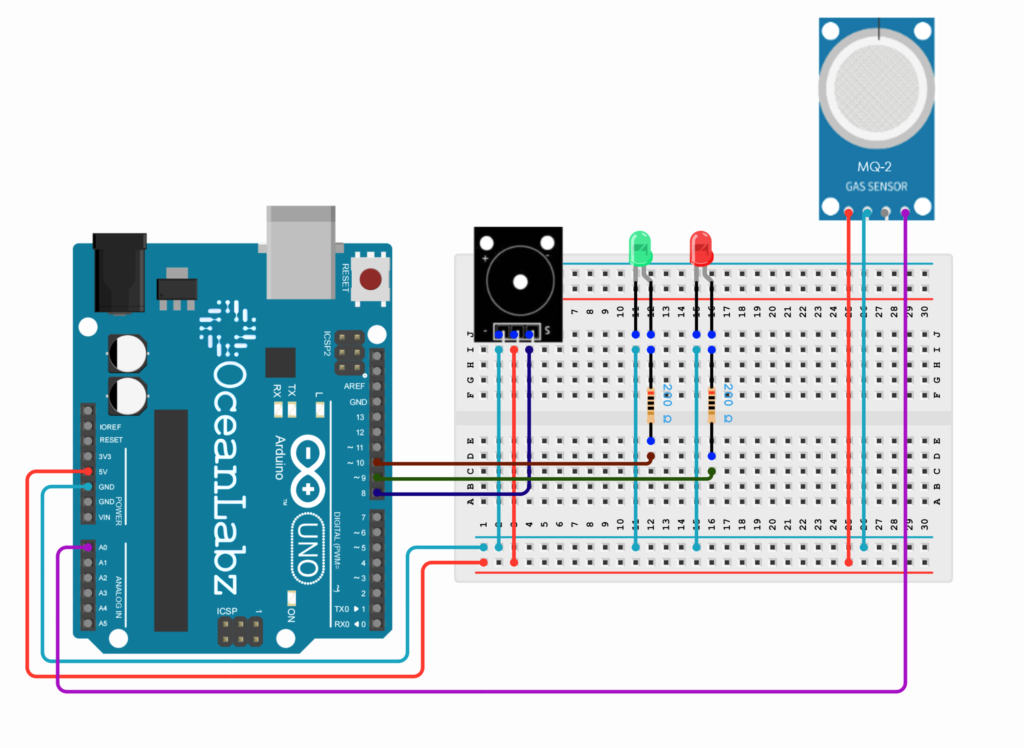
Circuit Diagram / Wiring
- MQ2 Gas Sensor
- MQ2 SENSOR VCC → 5V (Arduino)
- MQ2 SENSOR GND → GND (Arduino)
- MQ2 SENSOR AO (Analog Output) → Pin A0 (Arduino)
- Buzzer Module
- Buzzer VCC → 5V (Arduino)
- Buzzer GND → GND (Arduino)
- Buzzer SINGNAL → Pin D8 (Arduino)
- LEDs
- Connect the red LED anode to pin 9 (via a 220-ohm resistor) and cathode to GND.
- Connect the green LED anode to pin 10 (via a 220-ohm resistor) and cathode to GND.

Arduino Code
// Define pins
const int mq2Pin = A0;  // Analog pin for MQ-2 sensor output
const int buzzerPin = 8; // Digital pin for buzzer
const int redLED = 9;    // Digital pin for Red LED (Gas/Smoke Alert)
const int greenLED = 10; // Digital pin for Green LED (Normal state)

// Detection threshold (calibrate as needed)
const int detectionThresholdGas = 600;  // Threshold for gas detection
const int detectionThresholdSmoke = 30;  // Threshold for smoke detection (adjusted)

void setup() {
  pinMode(buzzerPin, OUTPUT);  // Set buzzer as output
  pinMode(redLED, OUTPUT);     // Set Red LED as output
  pinMode(greenLED, OUTPUT);   // Set Green LED as output
  Serial.begin(9600);          // Initialize serial communication
}

void loop() {
  int sensorValue = analogRead(mq2Pin); // Read MQ-2 sensor value
  Serial.print("Sensor Value: ");
  Serial.println(sensorValue);

  // Check if gas or smoke is detected
  if (sensorValue > detectionThresholdGas) {
    // Gas detected
    Serial.println("Gas Detected!");
    digitalWrite(redLED, HIGH);  // Turn on Red LED
    digitalWrite(greenLED, LOW); // Turn off Green LED
    tone(buzzerPin, 1500, 500);  // Play a tone at 1500 Hz for 500ms
  }
  else if (sensorValue > detectionThresholdSmoke) {
    // Smoke detected (if value is above smoke threshold)
    Serial.println("Smoke Detected!");
    digitalWrite(redLED, HIGH);  // Turn on Red LED
    digitalWrite(greenLED, LOW); // Turn off Green LED
    tone(buzzerPin, 1500, 500);  // Play a tone at 1500 Hz for 500ms
  }
  else {
    // No Gas or Smoke detected
    Serial.println("No Gas or Smoke Detected!");
    digitalWrite(redLED, LOW);   // Turn off Red LED
    digitalWrite(greenLED, HIGH); // Turn on Green LED
    noTone(buzzerPin);           // Stop buzzer sound
  }

  delay(1000); // Delay for stable readings
}
Explanation:
Sensor Setup: The MQ-2 gas and smoke sensor is connected to analog pin A0. The buzzer, red LED, and green LED are connected to digital pins 8, 9, and 10 respectively.
Thresholds for Detection: The code defines two detection thresholds:
detectionThresholdGas: 600 for detecting gas.detectionThresholdSmoke: 30 for detecting smoke.
Detection Logic:
- If the sensor value exceeds the gas threshold, the red LED is turned on, the green LED is turned off, and a buzzer tone is emitted.
- If the sensor value exceeds the smoke threshold, the same actions are performed for smoke detection.
- If neither is detected, the red LED is off, the green LED is on, and the buzzer is off.
Serial Output: The sensor value and detection status (gas or smoke) are displayed on the serial monitor for real-time feedback.
Troubleshooting
- Set up the sensor and open the Serial Monitor.
- Expose it to gas (e.g., butane) and smoke and note the sensor values.
- Set thresholds based on your observations:
- Gas threshold: e.g., 600.
- Smoke threshold: e.g., 30.
Adjust the values in your code:
const int detectionThresholdGas = 600;
const int detectionThresholdSmoke = 30;
Test and adjust as needed for more accuracy.


